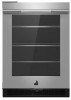
Jenn-Air JUGFL242HL1 Owners Manual 1 - Page 5
Installation Requirements
 |
View all Jenn-Air JUGFL242HL1 manuals
Add to My Manuals
Save this manual to your list of manuals |
Page 5 highlights
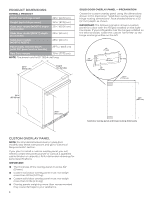
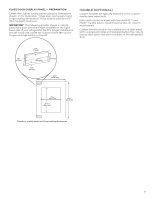
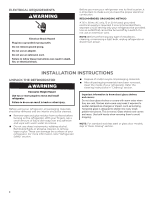
INSTALLATION REQUIREMENTS TOOLS AND PARTS Gather the required tools and parts before starting installation TOOLS AND PARTS NEEDED: Phillips screwdriver Custom Overlay Door Panel - Refer " Custom Overlay Panel Preparation." Custom handle and mounting hardware (optional) PARTS SUPPLIED: M4 x 30 flathead screws (8) LOCATION REQUIREMENTS WARNING G I F C G EH F D B Recessed receptacle locations Utility opening A Explosion Hazard Keep flammable materials and vapors, such as gasoline, away from refrigerator. Failure to do so can result in death, explosion, or fire. IMPORTANT: This appliances is intended to be used in household and similar applications such as: Staff kitchen areas in shops, office and other working environments; Farm houses and by clients in hotels, motels and other residential type environments; Bed and breakfast type environments; Catering and similar non-retail applications. NOTES: For the refrigerator to be flush with the front of the base cabinets, remove any baseboards or moldings from the rear of the opening. Refer "Product Dimensions" and later in this section, "Opening Dimensions." It is recommended that you do not install the refrigerator near an oven, radiator, or other heat source. Do not install in a location where the temperature will fall below 55°F (13°C). For best performance, do not install the refrigerator behind a cabinet door or block the base grille. OPENING DIMENSIONS Height dimensions are shown with the leveling legs extended to the minimum height. NOTE: When leveling legs are fully extended, add 5/8" (15 mm) to the height dimensions. Refer "Product Dimensions." If the floor of the opening is not level with the kitchen floor, shim the opening to make it level with the kitchen floor. Opening and utility location dimensions Opening width - A 24" (60.96 cm) min. Opening depth - B 24" (60.96 cm) min. Opening height - C 341/2" (87.6 cm) min. 35" (88.9 cm) max. Dimension - D 121/16" (30.64 cm) Dimension - E 213/4" (55.16 cm) Dimension - F 13/4" (4.44 cm) Dimension - G 3" (7.55 cm) Dimension - H 41/2" (11.37 cm) Dimension - I 91/4" (23.47 cm) For flush installation, the power outlet can be installed in adjacent cabinetry with a cutout on the power cord side for routing of the power cord. The power outlet can also be recessed on the back wall behind the unit as per recommended receptacle locations in the above illustration. 5
-
 1
1 -
 2
2 -
 3
3 -
 4
4 -
 5
5 -
 6
6 -
 7
7 -
 8
8 -
 9
9 -
 10
10 -
 11
11 -
12
-
13
-
14
-
15
-
16
-
17
-
18
-
19
-
20
-
21
-
22
-
23
-
24
-
25
-
26
-
27
-
28
-
29
-
30
-
31
-
32
-
33
-
34
-
35
-
36
-
37
-
38
-
39
-
40
 |
 |
