Kenmore 33968 Owners Manual - Page 21
Housekee, Temperature-Pressure, Relief, Valve
 |
View all Kenmore 33968 manuals
Add to My Manuals
Save this manual to your list of manuals |
Page 21 highlights
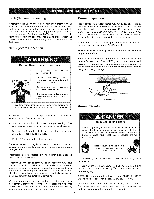
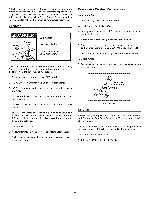
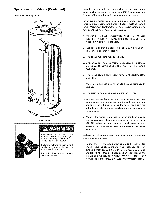
Housekee ipi£g Vacuum around base of water heater for dust, dirt, and lint on a regular basis. Fire and E×plosion Hazard • Do not obstruct combustion air openings at the bottom of the water heater. Do not use or store flammable vapor products such as gasoline, solvents or adhesives in the same room or area near water heater or other appliance. - Visibly inspect air intake screen at least once every six months and clean if accumulated lint. -Can cause serious injury or death. AT LEAST ONCE EVERY SIX MONTHS A VISUAL INSPECTION SHOULD BE MADE OF THE AIR INTAKE SCREEN. CLEAN IF LINT ACCUMULATIONS ARE NOTICED. INSTALLED IN SUITABLE AREA: To insure sufficient ventilation and combustion air supply, proper clearances from the water heater must be maintained. See Facts to Consider About the Location section. Combustible materials such as clothing, cleaning materials, or flammable liquids, etc. must not be placed against or adjacent to the water heater because they could catch on fire. Anode Rod rod, check for any leaks and immediately correct if found. In situations where clearance above the water heater is limited it may be necessary to bend the anode rod for removal. Flexible anode rods are available for replacement. In replacing the anode: 1. Turn off gas supply to the water heater. 2. Shut off the water supply and open a nearby hot water faucet to depressurize the water tank. 3. Drain approximately 5 gallons of water from tank (Refer to the "Draining and Flushing" section for proper procedures). Close drain valve. 4. Remove old anode rod. 5. Use Teflon _ tape or approved pipe sealant on threads and install new anode rod. 6. Turn on water supply and open to purge air from water system. immediately correct any if found. nearby hot water faucet Check for any leaks and 7. Restart the water heater as directed under the "Operating Your Water Heater" section. See the "Repair Parts Illustration" section for anode rod location. Temperature-Pressure Relief Valve The temperature-pressure at least once a year. relief valve must be manually operated • Burn hazard - Hot water discharge. Property Damage Hazard • Keep clear of relief valve discharge outlet. • Avoid water damage. • Inspection and replacement of anode rod required. Each heater contains at least one anode rod, which will slowly deplete while protecting the glass-lined tank from corrosion and prolonging the life of the water heater. Once the anode is depleted, the tank will start to corrode, eventually developing a leak. The use of a water softener may decrease the life of the water heater tank. The anode rod should be removed from the water heater tank every 3 years for inspection. The following are typical (but not all) signs of a depleted anode rod: When checking the temperature-pressure relief valve operation, make sure that (1) no one is in front of or around the outlet of the temperature-pressure relief valve discharge line, and (2) that the water discharge will not cause any property damage, as the water may be extremely hot, see Figure 25. TEMPERATURE-PRESSURE DISCHARGE PiPE • The majority of the rod's diameter is less than 3/8". FIGURE 25. • Significant sections of the support wire (approx. 1/3 or more of the anode rod's length) are visible. If after manually operating the valve, it fails to completely reset and continues to release water, immediately close the cold water If the anode rod shows signs of either or both it should be inlet to the water heater, follow the draining instructions, and replaced. NOTE: Whether re-installing or replacing the anode replace the temperature-pressure relief valve with a new one. 2I
-
 1
1 -
2
-
3
-
4
-
5
-
6
-
7
-
8
-
9
-
10
-
11
-
12
-
13
-
14
-
15
-
 16
16 -
 17
17 -
 18
18 -
 19
19 -
 20
20 -
 21
21 -
 22
22 -
 23
23 -
 24
24 -
 25
25 -
 26
26 -
27
-
28
-
29
-
30
 |
 |