Kenmore 4804 Use and Care Guide - Page 9
Setting, Oven Controls
 |
View all Kenmore 4804 manuals
Add to My Manuals
Save this manual to your list of manuals |
Page 9 highlights
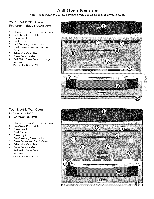
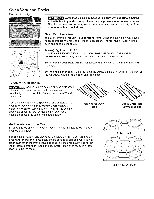
Setting the Oven Controls Setting Continuous Bake or 12 Hour Energy Saving The TIMER _ and FLEX CLEAN @ pads control the Continuous Bake or 12 Hour Energy Saving features. The oven control has a factory preset built-in 12 Hour Energy Saving feature that will shut off the oven if the oven control is left on for more than 11 hours and 59 minutes. The oven can be programmed to override this feature for Continuous Baking. INSTRUCTIONS PR ESS DISPLAY Energy Saving features T1.o sPeret ssthaendcohonltdro_l fofror C7osnetcinoundOsUSourntBil athkee coonrtro1l 2beepsHOUronce (Fig. 1). "12h" or_-_=%h" will appear in the display and the control _ for 7 _seconds Fig. 1 2. wPrilel sbsee@p onctoe. switch between the 12 Hour Energy Saving and @ continuous bake features. Note: "12h" (Fig. 2) in the display indicates the control is set for the 12 Hour Energy Saving mode andBake"=f(eFaitgu.re3.)=ihn"dicates the control is set for the Continuous 3. Press (_ to accept the change (Fig. 4; display will return to (_ time of day) or press _ to reject the change, or _ Fig. 2 Fig. 3 Fig. 4 Setting Timer The TIMER _ pad controls the Timer feature. The Timer serves as an extra timer in the kitchen that will beep when the set time has run out. It does not start or stop cooking. The Timer feature can be used during any of the other oven control functions. Refer to "Minimum and Maximum Control Pad Settings" for time amount settings. iNSTRUCTiONS To set the Kitchen Timer (example for 5 minutes) 1. Press (Fig. 5). 2. Press the number pads to set the desired time in the display (example (_). down (Fig. 6). Press _. The time will begin a count PRESS @ Q@ DISPLAY Fig. 5 Note: If ____ARiTS_not pressed the timer will return to the time of day after 25 seconds. 3. When the set time has run out, the clock will sound with 3 long beeps every 5 seconds until _ is pressed (Fig. 7). Fig. 6 To cancel the Timer before the set time has run out Press _. The ",¢z_ZC>" display will return to the time of day. Fig. 7 To Set Add 1 Minute Feature The @ ADD 1 MINUTE pad is used to set the Add 1 Minute feature. When the @ pad is pressed, 1 minute is added to the Timer feature if this feature is already active. If the Timer feature is not active and the _ pad is pressed, the Timer feature will become active and will begin counting down from 1 minute. For further information on how to set the Timer feature see Setting Timer instructions above.
-
 1
1 -
2
-
3
-
 4
4 -
 5
5 -
 6
6 -
 7
7 -
 8
8 -
 9
9 -
 10
10 -
 11
11 -
 12
12 -
 13
13 -
 14
14 -
15
-
16
-
17
-
18
-
19
-
20
-
21
-
22
-
23
-
24
-
25
-
26
-
27
-
28
-
29
-
30
-
31
-
32
-
33
-
34
-
35
-
36
 |
 |
