Kenmore 75251 Owners Manual - Page 8
Removal, From Window
 |
View all Kenmore 75251 manuals
Add to My Manuals
Save this manual to your list of manuals |
Page 8 highlights
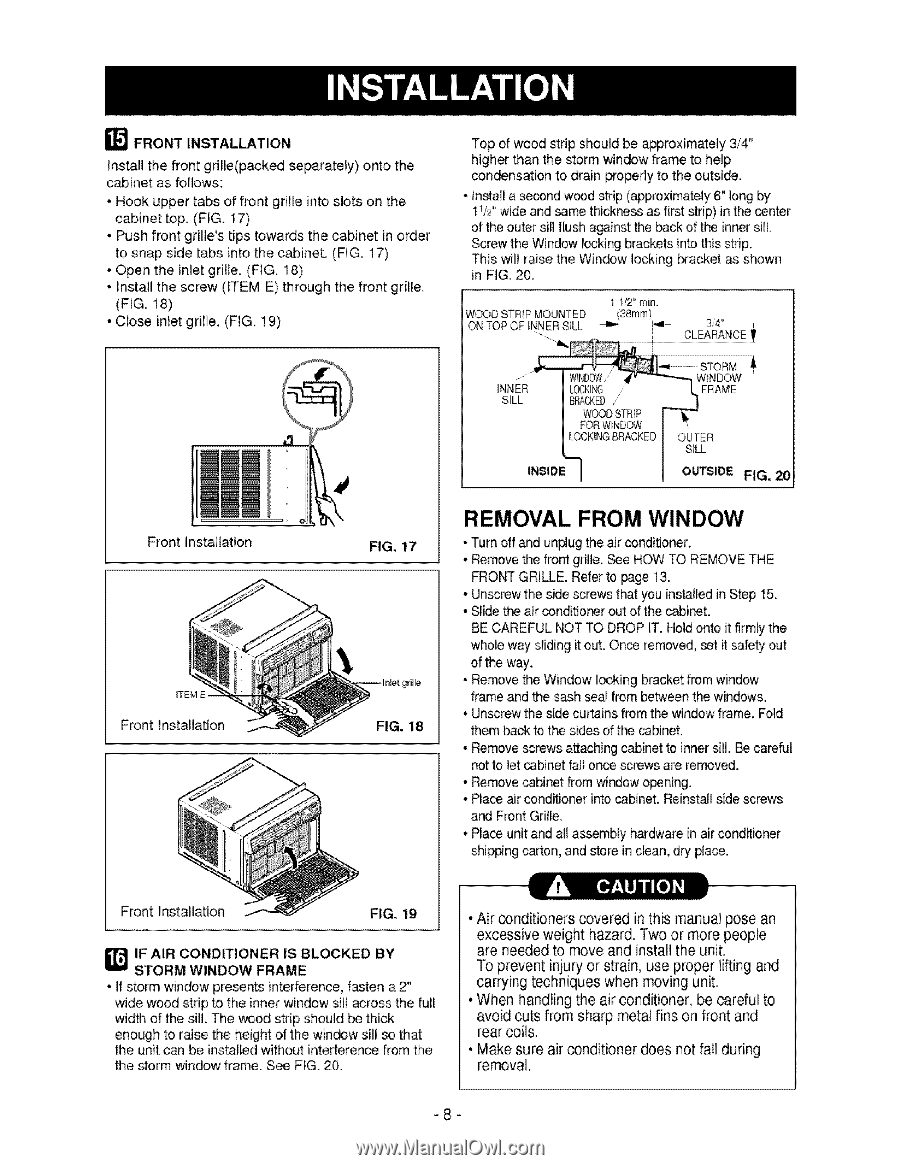
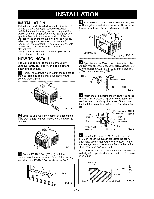
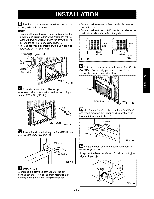
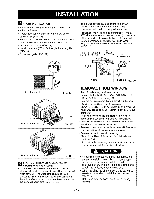
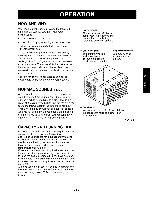
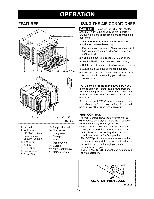
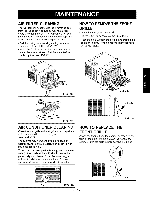
_ FRONT INSTALLATION Install the front grille(packed separately) onto the cabinet as foNows: • Hook upper tabs of front gritle into slots on the cabinet top. (FIG. 17) • Push front griIWs tips towards the cabinet in order to snap side tabs into the cabinet, (FIG, 17) • Open the inlet grille. (FIG. 18) • Install the screw (_TEM E) through the front grille. (FIG. 18) • Close inlet grille, (FIG, t9) Top d wood strip should be approximately 3/4" higher than the storm window frame to help condensation to drain properly to the outside, • _nstal_a _nd w_d strip (approximately 6" long by 11/2"wide and same thickr_ss as first strip) in the center of the outer sill flush a_inst: the back of the inner sill, Screw the Window I_king brackets into this strip. This will raise the, Window locking bracket as shown in FIG 20, WOOD STRIP MOUNTED ON TOP OF INNER SILl,, 3/4 CLEARANCE Front Installation _EM E Front Installation FiG. 17 FIG. 18 SILL LOCKIt@ BPACKEO,' WOODSTRIP FORWINDOW LOCK!NGBRACKED WINDOW FRAME SiLL OUTSlOE FIG, 20 REMOVAL FROM WINDOW • Turn off and un#ug the air conditJonero • Removethe front grille. See HOW TO REMOVETHE FRONT GRILLE. Refer to _ge 13. • Undrew the side screws that you installed in Step 15, • Slide tie air condiflo_r out of the cabinet. BE CAREFUL NOT TO DROP IT. Holdonto it firmlythe who_eway sliding it old, Once removed, set it safety out of the way, • Removethe Window locking bracketfrom window frame and the sash sea! from between the windows, ° Unscrew the side curtains from the window frame, Fold them back to the sides of the cabinet. • Removescrews attaching cabinet to inner sill. Be careDl not to let _bJnet fail on_ screws are removed, • Removecabinet from window opening. • Place air conditioner into _bJnet. Reinstall side screws and Front Grii_e, ° Place unit and all assembly h_dware in air conditioner shipping carton, and store in clean, dry #ace. Front Installation FIG. 19 ISFTOAIRRM COWNINDDITOIOWNERFRAMISE BLOCKED BY • If storm window presents interference, fasten a 2" wide wood strip to the inner window s]l! across the full width of the sill. The wood strip should be thick enough to raise the height of the window sill so that the unit can be installed without interference from the the storm window frame. See FIG. 20. • Air _nditioners covered in this manual pose an excessive weight hazard. Two or more people are ne_ed to move and install the unit. To prevent injury or strain, use proper lifting and carrying techniques when moving unit. ° When handling the air conditioner, be careful to avoid cuts from sharp metal fins on front and rear coils. • Make sure air conditioner does not fall during removal. -8-
-
 1
1 -
2
-
 3
3 -
 4
4 -
 5
5 -
 6
6 -
 7
7 -
 8
8 -
 9
9 -
 10
10 -
 11
11 -
 12
12 -
 13
13 -
14
-
15
-
16
-
17
-
18
-
19
-
20
-
21
-
22
-
23
-
24
-
25
-
26
-
27
-
28
-
29
-
30
-
31
-
32
 |
 |