Kenmore 7759 Owners Manual - Page 10
To Dispense Ice and Water, To Stop Dispensing, To Remove ce Storage Bin, To Replace Ice Storage Bin
 |
View all Kenmore 7759 manuals
Add to My Manuals
Save this manual to your list of manuals |
Page 10 highlights
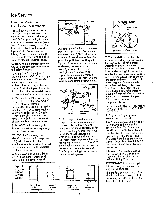
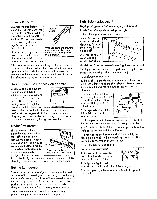
Ice & Water Dispenser (continued) To Dispense Ice and Water • Set the selector switch to CUBES, CRUSHED ICE (on some models) or WATER. ° Grip the glass or other container near the rim and press the rim against the center of the pad When Dispensing Ice: • Same crushed ice may be dispensed even though you selected CUBES_This happens occasionally when a few cubes get channeled to the crusher ° Sometimes a mound of snow will form on the door in the ice chute. Th_scondition is normal, and usually occurs when you have dispensed crushed ice repeatedly. The snow will eventually evaporate. • Sometimes crushed ice will spray beyond the glass To avoid this, hold the glass up close to lhe chute_ When Dispensing Water: • The first glass of water dispensed may be warmer than the following ones._This is normal • Dispensedwater is cool, not iced Forcolder water, simply add crushed ice or cubes before dispensing water. CAUTION: Never put fingers or other objects into the dispenser opening To Stop Dispensing Release pressure from the pod and waita few seconds to catch the last bits of ice or drops of water_ There may be some dripping after dispensing of crushed ice or water. If there is a lot of dripping, the spill should be wiped dry right away Do not pour water in the spill shelf because it is not self draining-pour it in the kitchen sink.The shelf and its grille should be cleaned regularly according to Care and Cleaning instructions° The grille is easily removed by pressing on t_e back right corner Press here to remove gfilre If )ce Clumps Form in the Storage Bin.,. The icemaker ejects cubes in groups of eight, and it is normal for several cubes to be joined together However, if you don't use the ice very often ice clumps may form in the storage bin and can clog the dispenser If this happens: ° Remove the storage bin from the freezer. ,, Break up ice clumps with your hands Throw away any clumps that you can't break up. ° Replace the bin before the remaining cubes melt and fuse together • After washing the bin, allow it to cool before replacing it, otherwise ice will stick to the metal auger. To Remove )ce Storage Bin Lift the left corner to free the bin from the shelf. Pull the bin straight out while supporting it at front and back.. To Replace Ice Storage Bin _, Slide the bin back until the tab on the bin locks into the slot in the shelf IFthe bin does not go all the way back, remove it and turn the drive mechanism 1/4 turn Then push the bin back again until the tab on the bin locks into the slot in the shelf. 10
-
 1
1 -
2
-
3
-
4
-
 5
5 -
 6
6 -
 7
7 -
 8
8 -
 9
9 -
 10
10 -
 11
11 -
 12
12 -
 13
13 -
 14
14 -
 15
15 -
16
-
17
-
18
-
19
-
20
-
21
-
22
-
23
-
24
-
25
-
26
-
27
-
28
-
29
-
30
-
31
-
32
-
33
-
34
-
35
-
36
-
37
-
38
-
39
-
40
-
41
-
42
-
43
-
44
-
45
-
46
-
47
-
48
-
49
-
50
-
51
-
52
 |
 |