Kenwood CT-403 User Manual - Page 17
Convenient CD recording (deck B only
 |
View all Kenwood CT-403 manuals
Add to My Manuals
Save this manual to your list of manuals |
Page 17 highlights
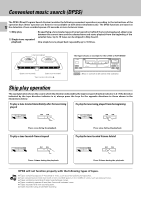
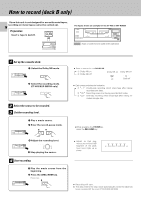
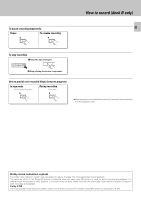
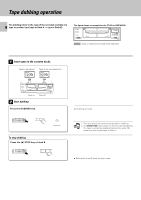
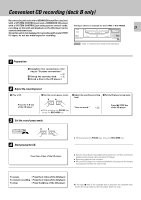
Convenient CD recording (deck B only) By connecting this unit with a KENWOOD amplifier (receiver) with a SYSTEM CONTROL jack and a KENWOOD CD player with a SYSTEM CONTROL jack using system control cords, recording on this unit and playback on the CD player can be The figure shows an example for the CT-403 or KXF-W3030 17 started simultaneously. POWER PUSH/OPEN 0 PUSH/OPEN 0 (dB) - -5 0 +3 +6 (dB) Since this unit is not designed for recording with metal (TYPE IV) tapes, do not use metal tapes for recording. 1¡ TAPE A AUTO REVERSE TAPE B AUTO REVERSE 1 ¡ 8PAUSE ¶REC/ARM @ 7 # @ 7 # : Keys or controls to be used in this operation 1 Preparation 1 Complete the connections referring to "System connections". 6 2 Set up the cassette deck $ 3 (Load a disc in the CD player.) 2 Adjust the recording level. 1 Play a CD. 2 Set the record-pause mode. 8PAUSE ¶REC/ARM 3 Adjust the recording recording 4 Put the CD player in stop mode. level. Press the 6 key of the CD player. ÷ While pressing the PAUSE key, press the REC/ARM key. "How to record." $ Press (7) STOP key of the CD player. 3 Set the record-pause mode. (dB) - -5 0 +3 +6 (dB) 8PAUSE ¶REC/ARM 4 Start playing the CD. ÷ While pressing the PAUSE key, press the REC/ARM key. Press the 6 key of the CD player. ÷ Synchro recording is not possible when tracks of more than one CD are programmed using a Carrousel type CD player. ÷ Recording starts at this moment. ÷ When the CD player has completed playback, the cassette deck stops recording and enters the stop mode. To pause : Press the 6 key of the CD player. To restart recording : Press the 6 key of the CD player. To stop : Press the 7 key of the CD player. ÷ If the stop (7) key of the cassette deck is pressed, the cassette deck enters the stop mode but the CD player does not stop.
-
 1
1 -
2
-
3
-
4
-
5
-
6
-
7
-
8
-
9
-
10
-
11
-
 12
12 -
 13
13 -
 14
14 -
 15
15 -
 16
16 -
 17
17 -
 18
18 -
 19
19 -
 20
20
 |
 |
