Kenwood DPX-7000DAB Operation Manual - Page 31
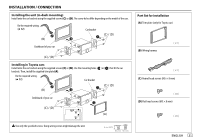
Part list for installation, Installing the unit in-dash mounting, Installing in Toyota cars
 |
View all Kenwood DPX-7000DAB manuals
Add to My Manuals
Save this manual to your list of manuals |
Page 31 highlights
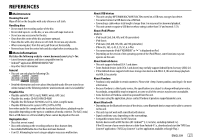
INSTALLATION / CONNECTION Installing the unit (in-dash mounting) Install onto the car brackets using the supplied screws (C) or (D). The screw holes differ depending on the model of the cars. Do the required wiring. ( 32) Car bracket Part list for installation (A) Trim plate (only for Toyota car) Dashboard of your car Installing in Toyota cars Install onto the car brackets using the supplied screws (C) or (D). Use the mounting holes ( ) or ( ) that fit the car brackets. Then, install the supplied trim plate (A). Do the required wiring. ( 32) Car bracket (B) Wiring harness (C) Round head screws (M5 × 8 mm) Dashboard of your car (D) Flat head screws (M5 × 8 mm) Use only the specified screws. Using wrong screws might damage the unit. ENGLISH 31
-
 1
1 -
2
-
3
-
4
-
5
-
6
-
7
-
8
-
9
-
10
-
11
-
12
-
13
-
14
-
15
-
16
-
17
-
18
-
19
-
20
-
21
-
22
-
23
-
24
-
25
-
 26
26 -
 27
27 -
 28
28 -
 29
29 -
 30
30 -
 31
31 -
 32
32 -
 33
33 -
 34
34 -
 35
35 -
 36
36
 |
 |
