Kenwood DPX503 Instruction Manual - Page 21
Manual position setting, Audio Preset Memory - manual english
 |
UPC - 019048180032
View all Kenwood DPX503 manuals
Add to My Manuals
Save this manual to your list of manuals |
Page 21 highlights
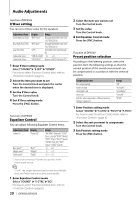
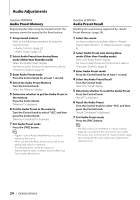
Function of DPX503 Manual position setting Making fine adjustment of the value specified at Preset position selection per speaker. 1 Enter Position setting mode Select "SOUND" > "S-CTRL" > "POSIT" > "M-POSI". For how to select Function Control item, refer to (page 6). 2 Select the speaker you want to adjust Item "Front Lch" "Front Rch" "Rear Lch" "Rear Rch" "Sub Lch" "Sub Rch" Setting overview Front Left speaker Front Right speaker Rear Left speaker Rear Right speaker Subwoofer Left Subwoofer Right Turn the Control knob and push the center when the desired item is displayed. 3 Adjust the speaker Turn the Control knob. Adjust between 0 and 5.58 feet. 4 Exit Position setting mode Press the [FNC] button. ⁄ • When you select "USER" at (page 20), the adjusted setting value will be recalled. Function of DPX503 Audio Preset Memory Registering the value setup by Sound Control. The memory cannot be erased by the Reset button. 1 Setup Sound Control Refer to the following operations to setup the Sound Control. - Cabin selection (page 19) - DTA (Digital Time Alignment) setting (page 19) - X'Over setting (page 20) - Equalizer Control (page 20) - Preset position selection (page 20) - Manual position setting (page 21) 2 Enter Audio Preset Memory mode Select "SOUND" > "PRESET" > "MEMO". For how to select Function Control item, refer to (page 6). 3 Put the Audio Preset in the memory Press the Control knob. "Memory?" is displayed. 4 Turn the Control knob to select "YES", and then press the Control knob. "Memory Completed" is displayed. 5 Exit Audio Preset mode Press the [FNC] button. ⁄ • Register 1 pair of Audio Preset Memory. You cannot register by the source. • When you press the Reset, all the sources will be the setting value which is registered. English | 21
-
 1
1 -
2
-
3
-
4
-
5
-
6
-
7
-
8
-
9
-
10
-
11
-
12
-
13
-
14
-
15
-
 16
16 -
 17
17 -
 18
18 -
 19
19 -
 20
20 -
 21
21 -
 22
22 -
 23
23 -
 24
24 -
 25
25 -
 26
26 -
27
-
28
-
29
-
30
-
31
-
32
-
33
-
34
-
35
-
36
-
37
-
38
-
39
-
40
-
41
-
42
-
43
-
44
-
45
-
46
-
47
-
48
-
49
-
50
-
51
-
52
-
53
-
54
-
55
-
56
-
57
-
58
-
59
-
60
-
61
-
62
-
63
-
64
-
65
-
66
-
67
-
68
-
69
-
70
-
71
-
72
-
73
-
74
-
75
-
76
-
77
-
78
-
79
-
80
-
81
-
82
-
83
-
84
-
85
-
86
-
87
-
88
-
89
-
90
-
91
-
92
-
93
-
94
-
95
-
96
-
97
-
98
-
99
-
100
-
101
-
102
-
103
-
104
-
105
-
106
-
107
-
108
-
109
-
110
-
111
-
112
 |
 |
