Kenwood DPX503 Instruction Manual - Page 8
Display Settings - manual
 |
UPC - 019048180032
View all Kenwood DPX503 manuals
Add to My Manuals
Save this manual to your list of manuals |
Page 8 highlights
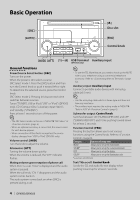
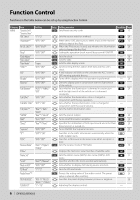
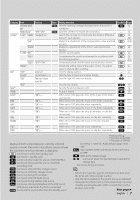
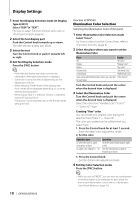
Function Control Display Settings 1 Enter Function Control mode Press the [FNC] button. Function icon is displayed. 2 Select your desired setup item Operation type Operation Movement between items Turn the Control knob. Selection of item Press the Control knob. Return to previous item Press the [FNC] button or" "icon. Repeat selection and determination until your desired setup item is selected. Example: MENU DISP COLOR MENU DISP COLOR TYPE SIDE TEXT In this manual, the above selection is indicated as Select "DISP" > "TYPE". 3 Make a setting Turn the Control knob to select a setting value, and then press the Control knob. • The value of items with mark can be set by pushing the Control knob towards right or left. • Some items require you to keep pressing the Control knob for 1 or 2 seconds so that you can make a setting. For these items, the time during which you need to keep pressing the Control knob is displayed in the Entry column in seconds. • For the functions accompanied by the description of the setting procedure and so forth, the reference page numbers are displayed. 4 Exit Function Control mode Press the [FNC] button for at least 1 second. ⁄ • *3 Location played with "File Scan" - Audio file: First 10 seconds - Music Editor media: First 10 seconds or the part picked by Intro Skip. During Intro Skip, turn the control knob left or right to change the song. The scan method depends on the Music Editor setting. See the Music Editor help for details. About Display Type Shown below are examples of display types. Display "TYPE [A]" Display Type 3 1 "TYPE [B]" "TYPE [C]" "TYPE [D]" 2 3 1 1 4 5 6 1 Text display part 2 Status display 3 Icon display part 4 Display (varied depending on the source) 5 Clock display 6 Spectrum Analyzer display 8 | DPX503/DPX303
-
 1
1 -
2
-
 3
3 -
 4
4 -
 5
5 -
 6
6 -
 7
7 -
 8
8 -
 9
9 -
 10
10 -
 11
11 -
 12
12 -
 13
13 -
14
-
15
-
16
-
17
-
18
-
19
-
20
-
21
-
22
-
23
-
24
-
25
-
26
-
27
-
28
-
29
-
30
-
31
-
32
-
33
-
34
-
35
-
36
-
37
-
38
-
39
-
40
-
41
-
42
-
43
-
44
-
45
-
46
-
47
-
48
-
49
-
50
-
51
-
52
-
53
-
54
-
55
-
56
-
57
-
58
-
59
-
60
-
61
-
62
-
63
-
64
-
65
-
66
-
67
-
68
-
69
-
70
-
71
-
72
-
73
-
74
-
75
-
76
-
77
-
78
-
79
-
80
-
81
-
82
-
83
-
84
-
85
-
86
-
87
-
88
-
89
-
90
-
91
-
92
-
93
-
94
-
95
-
96
-
97
-
98
-
99
-
100
-
101
-
102
-
103
-
104
-
105
-
106
-
107
-
108
-
109
-
110
-
111
-
112
 |
 |
