Kenwood KMR-D378BT Instruction Manual - Page 39
Display Settings
 |
View all Kenwood KMR-D378BT manuals
Add to My Manuals
Save this manual to your list of manuals |
Page 39 highlights
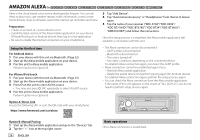
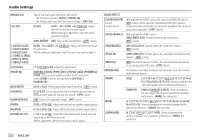
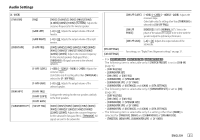
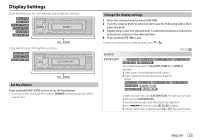
Display Settings Zone identification for color settings and brightness settings Zone identification for brightness setting Set the dimmer Press and hold DISP (DIM) to turn on or off the dimmer. • Once you press and hold this button, [DIMMER] setting (page 34) will be overwritten. Change the display settings 1 Press the volume knob to enter [FUNCTION]. 2 Turn the volume knob to select an item (see the following table), then press the knob. 3 Repeat step 2 until the desired item is selected/activated or follow the instructions stated on the selected item. 4 Press and hold to exit. To return to the previous setting item, press . Default: [XX] [DISPLAY] [COLOR SELECT] (For / / / / / ) Selects illumination colors for [ALL ZONE], [ZONE 1] and [ZONE 2] separately. 1 Select a zone. (See the illustration on left column.) 2 Select a preset color for the selected zone. (Page 34) Default: / / / / : [VARIABLE SCAN] : [INITIAL COLOR] To make your own color, select [CUSTOM R/G/B]. The color you have made will be stored in [CUSTOM R/G/B]. 1 Press the volume knob to enter the detailed color adjustment. 2 Press S/T to select the color ([R]/[G]/[B]) to adjust. 3 Turn the volume knob to adjust the level ([0] to [9]), then press the knob. ENGLISH 33
-
 1
1 -
2
-
3
-
4
-
5
-
6
-
7
-
8
-
9
-
10
-
11
-
12
-
13
-
14
-
15
-
16
-
17
-
18
-
19
-
20
-
21
-
22
-
23
-
24
-
25
-
26
-
27
-
28
-
29
-
30
-
31
-
32
-
33
-
 34
34 -
 35
35 -
 36
36 -
 37
37 -
 38
38 -
 39
39 -
 40
40 -
 41
41 -
 42
42 -
 43
43 -
 44
44 -
45
-
46
-
47
-
48
-
49
-
50
-
51
-
52
-
53
-
54
-
55
-
56
-
57
-
58
-
59
-
60
-
61
-
62
-
63
-
64
-
65
-
66
-
67
-
68
-
69
-
70
-
71
-
72
-
73
-
74
-
75
-
76
-
77
-
78
-
79
-
80
-
81
-
82
-
83
-
84
-
85
-
86
-
87
-
88
-
89
-
90
-
91
-
92
-
93
-
94
-
95
-
96
-
97
-
98
-
99
-
100
-
101
-
102
-
103
-
104
-
105
-
106
-
107
-
108
-
109
-
110
-
111
-
112
-
113
-
114
-
115
-
116
-
117
-
118
-
119
-
120
-
121
-
122
-
123
-
124
-
125
-
126
-
127
-
128
-
129
-
130
-
131
-
132
-
133
-
134
-
135
-
136
-
137
-
138
-
139
-
140
-
141
-
142
-
143
-
144
-
145
-
146
-
147
-
148
-
149
-
150
-
151
-
152
-
153
-
154
-
155
-
156
-
157
-
158
-
159
-
160
 |
 |
