Kenwood X991 Instruction Manual - Page 20
G-Analyzer display Selection, G-Analyzer Stop Watch, Icon Display Switching
 |
View all Kenwood X991 manuals
Add to My Manuals
Save this manual to your list of manuals |
Page 20 highlights
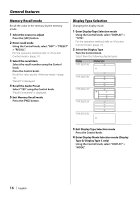
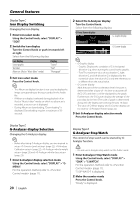
General features Display Type C Icon Display Switching Changing the Icon Display. 1 Enter Icon select mode Using the Control knob, select "DISPLAY" > "SIDE". 2 Switch the Icon display Turn the Control knob or push it towards left or right. Select from the following displays: Icon display Source graphic Text label Album art (iPod or "Music Editor" media) Display "Source" "Text" "Photograph" 3 Exit Icon select mode Press the Control knob. ⁄ • The Album art display function is not used to display the image corresponding to the tag recorded in the Audio file. • If Album art display is selected during playback of an iPod or "Music Editor" media on which no album art is recorded, a source icon is displayed. • During Album art downloading, "Down-loading" is displayed. Downloading requires a maximum of 30 seconds. 2 Select the G-Analyzer display Turn the Control knob. Select from the following displays. G-Force Sensor display G- Graphic display G-Counter display ⁄ • G-Graphic display - Graphic: Displays the condition of G in horizontal direction (e.g; when turning the curve) by the graphic. - Text: The maximum value of acceleration G, right direction G, and left direction G is displayed by the numerical value. The value of G is only the reference, so is different from the actual value. • G-Counter display Adds the point of the acceleration level. The point is determined after a lapse of 1 hr drive or at power off (ACC Off ), and then it will be displayed by the graph. Furthermore, the G-Counter displays the average of the past data by the line. (The scale of graph is determined along with the largest point among the past 10 data.) • The value of G-Meter display and G-Counter display can be reset by (page 22). 3 Exit G-Analyzer display selection mode Press the Control knob. Display Type E G-Analyzer display Selection Changing the G-Analyzer display. ⁄ • Before alternating G-Analyzer display, you are required to setup (page 22), (page 22), (page 23) and (page 23). 1 Enter G-Analyzer display selection mode Using the Control knob, select "DISPLAY" > "GMENU". For the operation method, refer to (page 11). 20 | English Display Type E G-Analyzer Stop Watch The control of stop watch can be started by GAnalyzer function. ¤ • Do not use G-Analyzer stop watch on the Public roads. 1 Enter G-Analyzer Stop Watch mode Using the Control knob, select "DISPLAY" > "GMA" > "S.WATCH". For the operation method, refer to (page 11). "STOP WATCH" is displayed. 2 Make the counter ready Press the Control knob. "Ready" is displayed.
-
 1
1 -
2
-
3
-
4
-
5
-
6
-
7
-
8
-
9
-
10
-
11
-
12
-
13
-
14
-
 15
15 -
 16
16 -
 17
17 -
 18
18 -
 19
19 -
 20
20 -
 21
21 -
 22
22 -
 23
23 -
 24
24 -
 25
25 -
26
-
27
-
28
-
29
-
30
-
31
-
32
-
33
-
34
-
35
-
36
-
37
-
38
-
39
-
40
-
41
-
42
-
43
-
44
-
45
-
46
-
47
-
48
-
49
-
50
-
51
-
52
-
53
-
54
-
55
-
56
-
57
-
58
-
59
-
60
-
61
-
62
-
63
-
64
 |
 |
