KitchenAid KDRS467VSS Use & Care Guide - Page 12
To Remove, To Replace - installation guide
 |
UPC - 883049156118
View all KitchenAid KDRS467VSS manuals
Add to My Manuals
Save this manual to your list of manuals |
Page 12 highlights
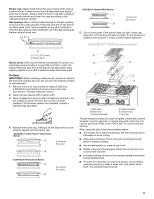
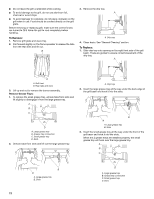
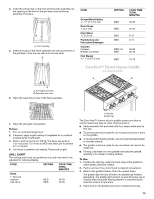
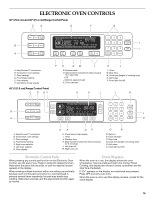
■ Do not leave the grill unattended while cooking. ■ To avoid damage to the grill, do not use aluminum foil, charcoal or wood chips. ■ To avoid damage to cookware, do not place cookware on the grill when in use. Food should be cooked directly on the grill grate. Before removing or replacing grill, make sure the control knobs are turned to OFF. Allow the grill to cool completely before handling. To Remove: 1. Remove grill grate and wave tray. 2. Pull forward slightly on the flame spreader to release the tabs from the rear slots and lift out. B 3. Remove the drip tray. A A. Drip tray 4. Clean basin. See "General Cleaning" section. To Replace: 1. Slide drip tray into opening on the right front side of the grill basin. There are guides to assure correct placement of the drip tray. A A A. Grill front B. Rear tabs and slots 3. Lift up and out to remove the burner assembly. Remove Grease Trays: 1. To remove the small grease tray, unhook tabs from slots and lift slightly to disengage it from the large grease tray. A B C D A. Large grease tray B. Grease tray connection C. Small grease tray D. Slots 2. Unhook tabs from slots and lift out the large grease tray. A. Drip tray 2. Insert the large grease tray all the way under the back edge of the grill basin and hook it into the slots. B A A. Large grease tray B. Slots 3. Insert the small grease tray all the way under the front of the grill basin and hook it into the slots. When the 2 grease trays are installed properly, the small grease tray will hook over the large grease tray. A B C B A A. Large grease tray B. Slots 12 D A. Large grease tray B. Grease tray connection C. Small grease tray D. Slots
-
 1
1 -
2
-
3
-
4
-
5
-
6
-
 7
7 -
 8
8 -
 9
9 -
 10
10 -
 11
11 -
 12
12 -
 13
13 -
 14
14 -
 15
15 -
 16
16 -
 17
17 -
18
-
19
-
20
-
21
-
22
-
23
-
24
-
25
-
26
-
27
-
28
-
29
-
30
-
31
-
32
-
33
-
34
-
35
-
36
-
37
-
38
-
39
-
40
-
41
-
42
-
43
-
44
-
45
-
46
-
47
-
48
-
49
-
50
-
51
-
52
-
53
-
54
-
55
-
56
-
57
-
58
-
59
-
60
-
61
-
62
-
63
-
64
 |
 |
