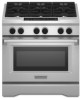
KitchenAid KDRS467VSS Use & Care Guide - Page 27
Oven Lights, Oven Door - 48
 |
UPC - 883049156118
View all KitchenAid KDRS467VSS manuals
Add to My Manuals
Save this manual to your list of manuals |
Page 27 highlights
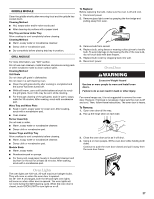
GRIDDLE MODULE Clean the griddle shortly after removing food and the griddle has cooled down. Cleaning Method: ■ Hot, soapy water and/or nylon scrub pad ■ After cleaning dry surface with a paper towel Drip Tray and Area Under Tray Allow cooktop to cool completely before cleaning. Cleaning Method: ■ Warm, soapy water or nonabrasive cleanser. ■ Damp cloth or nonabrasive pad. ■ Dry completely before placing drip tray in position. GRILL MODULE For more information, see "Grill" section. Do not use oven cleaners, metal brushes, abrasive scouring pads or other scrubbers made to clean outdoor grills. Cleaning Method: Grill Grate Do not clean grill grate in dishwasher. Do not clean in a self-cleaning oven. ■ Clean the grill grate shortly after cooking is completed and the burner has been turned off. ■ While still warm, use a soft bristle barbecue brush to scrub the grill grate. Oven mitts may be worn while cleaning. ■ For thorough cleaning of the grill grate, soak in warm, soapy water for 30 minutes. After soaking, scrub with nonabrasive pad. Wave Tray and Wave Plate ■ Soak in warm, soapy water to loosen soil. After soaking, scrub with a nonabrasive pad. ■ Oven cleaner. Burner Assembly Do not soak in water. ■ Warm, soapy water or nonabrasive cleanser. ■ Damp cloth or nonabrasive pad. Grease Trays and Drip Tray Allow cooktop to cool completely before cleaning. ■ Warm, soapy water or nonabrasive cleanser. ■ Damp cloth or nonabrasive pad. Module Basin ■ Warm, soapy water. ■ Nonabrasive pad or sponge. ■ For heavy soil, soak paper towels in household cleanser and lay them on the soil for at least 30 minutes. After soaking, scrub with a nonabrasive pad. To Replace: Before replacing the bulb, make sure the oven is off and cool. 1. Disconnect power. 2. Remove glass light cover by grasping the front edge and pulling away from oven. 3. Remove bulb from socket. 4. Replace bulb, using tissue or wearing cotton gloves to handle bulb. To avoid damage or decreasing the life of the new bulb, do not touch bulb with bare fingers. 5. Replace bulb cover by snapping back into wall. 6. Reconnect power. Oven Door WARNING Excessive Weight Hazard Use two or more people to move and install oven doors. Failure to do so can result in back or other injury. For normal range use, it is not suggested to remove the oven door. However, if removal is necessary, make sure the oven is off and cool. Then, follow these instructions. The oven door is heavy. To Remove: 1. Open oven door all the way. 2. Flip up the hinge latch on each side. 3. Close the oven door as far as it will shut. 4. Using 2 or more people, lift the oven door while holding both sides. Continue to push the oven door closed and pull it away from the oven door frame. Oven Lights The oven lights are 120-volt, 25-watt maximum halogen bulbs. They will come on when the oven door is opened. On 48" (121.9 cm) ranges, both the left and right oven lights will come on when either door is opened. The oven lights will not work during the Self-Cleaning cycle. When the oven door is closed, touch OVEN LIGHT to turn light on or off. 27
-
 1
1 -
2
-
3
-
4
-
5
-
6
-
7
-
8
-
9
-
10
-
11
-
12
-
13
-
14
-
15
-
16
-
17
-
18
-
19
-
20
-
21
-
 22
22 -
 23
23 -
 24
24 -
 25
25 -
 26
26 -
 27
27 -
 28
28 -
 29
29 -
 30
30 -
 31
31 -
 32
32 -
33
-
34
-
35
-
36
-
37
-
38
-
39
-
40
-
41
-
42
-
43
-
44
-
45
-
46
-
47
-
48
-
49
-
50
-
51
-
52
-
53
-
54
-
55
-
56
-
57
-
58
-
59
-
60
-
61
-
62
-
63
-
64
 |
 |
