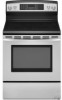
KitchenAid KERS205TSS User Guide - Page 18
More Options
 |
UPC - 883049134406
View all KitchenAid KERS205TSS manuals
Add to My Manuals
Save this manual to your list of manuals |
Page 18 highlights
Cook & Hold WARNING Food Poisoning Hazard More Options 7. Select the time to cook from the displayed times or use the number pads to enter the cooking time. The display will show "DELAY TIME," the selected function, the preset temperature and the delay time countdown. When the delay time has expired, the cook time will be displayed and the oven will begin to preheat. Do not let food sit in oven more than one hour before or after cooking. Doing so can result in food poisoning or sickness. 1. Press MORE OPTIONS. 2. Select COOK/HOLD. 3. Enter cook time using Quickset pads or the number pads. 4. Select BAKE or CONVECT. When BAKE is pressed, select the temperature using Quickset pads or the number pads. When CONVECT is pressed, select CNVT BAKE, CNVT ROAST or CNVT PASTRY, then select the desired temperature using the Quickset pads or the number pads. The oven will cook for the selected time, then Keep Warm for 1 hour. The oven will automatically turn off. IMPORTANT: If the recipe recommends preheating the oven, add 15 minutes to the cook time. Proofing (on some models) The Proofing feature can be used to raise yeast-based bread products prior to baking. There are two proofing methods available - Rapid and Standard. Standard proofing in the oven protects dough from room temperature changes or drafts that commonly affect proofing done on the countertop. Rapid proofing provides faster proofing results than countertop or Standard proofing, without harming the yeast. To Proof: 1. Press MORE OPTIONS. 2. Select PROOFING. 3. Select RAPID or STANDARD. 4. Press CANCEL when finished proofing. NOTES: ■ For any dough that requires one rise, either Standard or Rapid Proofing can be used. Delay ■ When using frozen bread dough, choose RAPID PROOFING. There is no need to thaw dough before proofing. WARNING Food Poisoning Hazard Do not let food sit in oven more than one hour before or after cooking. Doing so can result in food poisoning or sickness. ■ For dough requiring 2 rises, Standard Proofing must be used for the first rising period. Either Standard or Rapid Proofing can be used for the second rise. ■ If oven temperature is too high for proofing, "OVEN COOLING" will appear in the display. Keep Warm To Set Delay Bake: 1. Press MORE OPTIONS. 2. Use the arrow to scroll to select DELAY. 3. Select Delay time using Quickset pads or the number pads. 4. Select BAKE. 5. Select from the displayed temperatures or use the number pads to enter the temperature. 6. Select the time to cook from the displayed times or use the number pads to enter the cooking time. 7. The display will show "DELAY TIME," the selected function, the preset temperature and the delay time countdown. When the delay time has expired, the cook time will be displayed and the oven will begin to preheat. To set Delay Convect: (on some models) 1. Press MORE OPTIONS. 2. Use the arrow to scroll to select DELAY. 3. Select Delay time using Quickset pads or the number pads. 4. Use the arrow to scroll to select CONVECT. 5. Select CNVT BAKE, CNVT ROAST or CNVT PASTRY. 6. Select from the displayed temperatures or use the number pads to enter the temperature. WARNING Food Poisoning Hazard Do not let food sit in oven more than one hour before or after cooking. Doing so can result in food poisoning or sickness. IMPORTANT: Food must be at serving temperature before placing it in the warmed oven. Food may be held up to 1 hour; however, breads and casseroles may become too dry if left in the oven during Keep Warm. The Keep Warm feature allows hot cooked foods to stay at serving temperature. It can also be used at the end of a timed cook. Follow manufacturer's recommendations when warming empty serving bowls and plates. To Use: 1. Press MORE OPTIONS. 2. Press the arrow to scroll to select KEEP WARM. 18
-
 1
1 -
2
-
3
-
4
-
5
-
6
-
7
-
8
-
9
-
10
-
11
-
12
-
 13
13 -
 14
14 -
 15
15 -
 16
16 -
 17
17 -
 18
18 -
 19
19 -
 20
20 -
 21
21 -
 22
22 -
 23
23 -
24
-
25
-
26
-
27
-
28
-
29
-
30
-
31
-
32
-
33
-
34
-
35
-
36
-
37
-
38
-
39
-
40
-
41
-
42
-
43
-
44
-
45
-
46
-
47
-
48
-
49
-
50
-
51
-
52
 |
 |
