KitchenAid KFIS29PBMS Use & Care Guide - Page 8
Remove and Replace Freezer Drawer Front
 |
View all KitchenAid KFIS29PBMS manuals
Add to My Manuals
Save this manual to your list of manuals |
Page 8 highlights
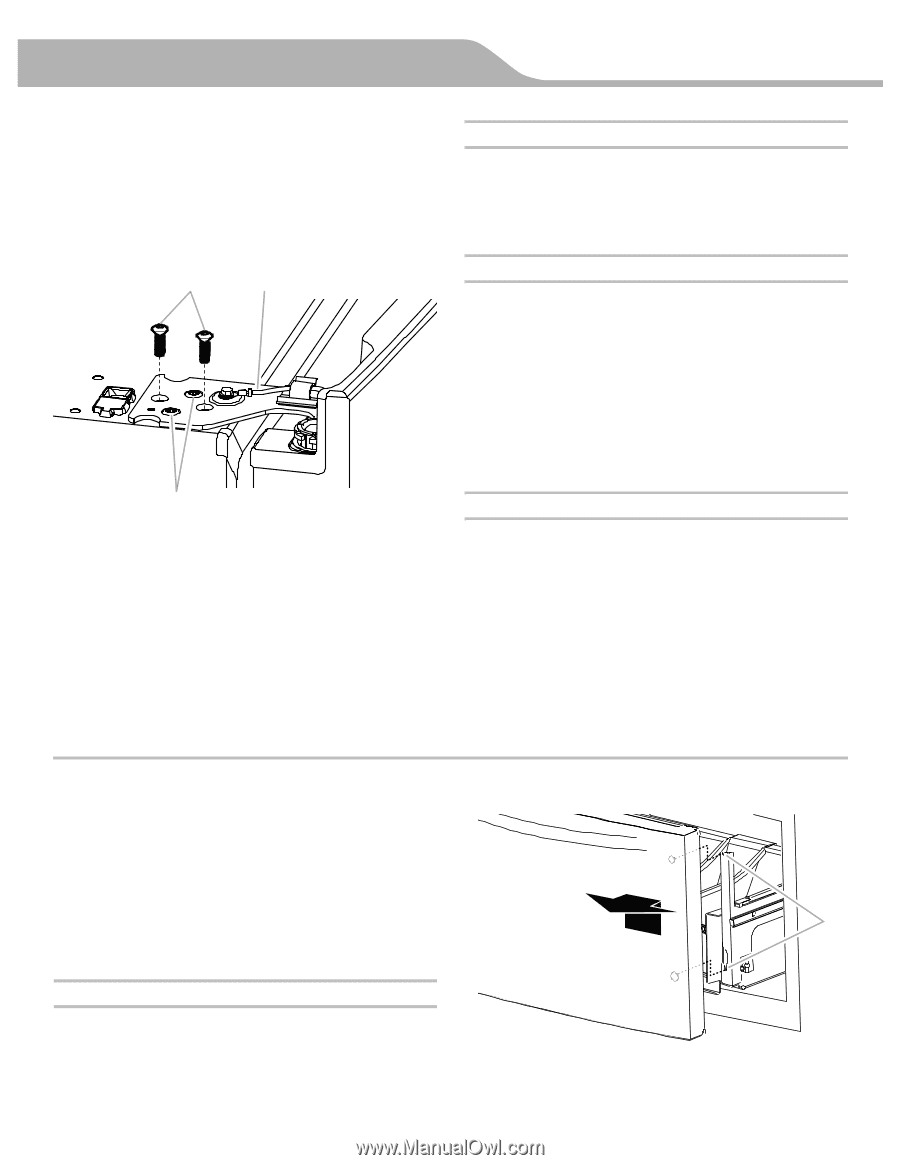
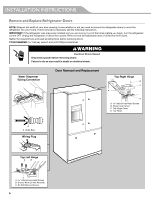
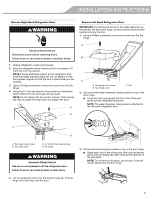
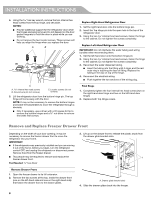
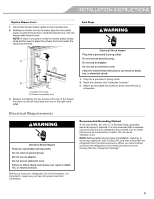
INSTALLATION INSTRUCTIONS 4. Using the hex key wrench, remove the two internal hex head screws from the top hinge, and set aside. NOTES: ■ Provide additional support for the refrigerator door while the hinges are being removed. Do not depend on the door gasket magnets to hold the door in place while you are working. ■ Do not remove the two locator screws. These screws will help you align the hinge when you replace the door. A B C A Internal hex head screws B. Ground wire (do not remove) C. Locator screws (do not remove) 5. Lift the refrigerator door from the bottom hinge pin. The top hinge will come away with the door. NOTE: It may not be necessary to remove the bottom hinges and brake feet assemblies to move the refrigerator through a doorway. ■ Only if necessary, use a driver with a #2 square bit tip to remove the bottom hinges and a ³⁄₈" nut driver to remove the brake feet screws. Replace Right-Hand Refrigerator Door 1. Set the right-hand door onto the bottom hinge pin. 2. Insert the Top Hinge pin into the open hole in the top of the refrigerator door. 3. Using the two internal hex head screws, fasten the hinge to the cabinet. Do not tighten the screws completely. Replace Left-Hand Refrigerator Door IMPORTANT: Do not intertwine the water tubing and wiring bundles when reconnecting them. 1. Set the left-hand door onto the bottom hinge pin. 2. Using the two internal hex head screws, fasten the hinge to the cabinet. Do not tighten the screws completely. 3. Reconnect the water dispenser tubing. ■ Insert the tubing into the fitting until it stops and the red outer ring is touching the face of fitting. Replace the tubing in the clip on top of the hinge. 4. Reconnect the electrical wiring. ■ Push together the two sections of the wiring plug. Final Steps 1. Completely tighten the four internal hex head screws (two on the right-hand door hinge and two on the left-hand door hinge). 2. Replace both Top Hinge covers. Remove and Replace Freezer Drawer Front Depending on the width of your door opening, it may be necessary to remove the freezer drawer front to move the refrigerator into your home. IMPORTANT: ■ If the refrigerator was previously installed and you are moving it out of the home, before you begin, turn the refrigerator control OFF, and unplug the refrigerator or disconnect power. Remove food from the freezer drawer. ■ Two people may be required to remove and replace the freezer drawer front. Tool Needed: ¹⁄₄" hex driver 3. Lift up on the drawer front to release the plastic studs from the drawer glide bracket slots. A Remove Drawer Front 1. Open the freezer drawer to its full extension. 2. Remove the two screws at the top, inside the drawer front (one on the left-hand side and one on the right-hand side) that fasten the drawer front to the drawer glides. A. Drawer glide bracket slots 4. Slide the drawer glides back into the freezer. 8
-
 1
1 -
2
-
 3
3 -
 4
4 -
 5
5 -
 6
6 -
 7
7 -
 8
8 -
 9
9 -
 10
10 -
 11
11 -
 12
12 -
 13
13 -
14
-
15
-
16
-
17
-
18
-
19
-
20
-
21
-
22
-
23
-
24
-
25
-
26
-
27
-
28
-
29
-
30
-
31
-
32
-
33
-
34
-
35
-
36
-
37
-
38
-
39
-
40
-
41
-
42
-
43
-
44
-
45
-
46
-
47
-
48
-
49
-
50
-
51
-
52
-
53
-
54
-
55
-
56
-
57
-
58
-
59
-
60
-
61
-
62
-
63
-
64
-
65
-
66
-
67
-
68
-
69
-
70
-
71
-
72
-
73
-
74
-
75
-
76
-
77
-
78
-
79
-
80
-
81
-
82
-
83
-
84
-
85
-
86
-
87
-
88
-
89
-
90
-
91
-
92
-
93
-
94
-
95
-
96
-
97
-
98
-
99
-
100
-
101
-
102
-
103
-
104
-
105
-
106
-
107
-
108
-
109
-
110
-
111
-
112
-
113
-
114
-
115
-
116
-
117
-
118
-
119
-
120
-
121
-
122
 |
 |