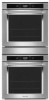
KitchenAid KODC504PPS Installation Instructions - Page 10
Single Oven Installation
 |
View all KitchenAid KODC504PPS manuals
Add to My Manuals
Save this manual to your list of manuals |
Page 10 highlights
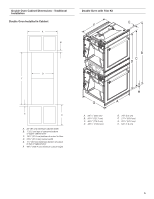
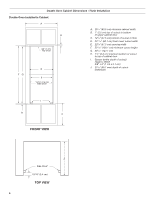
Optional Trim Kit Installation: Trim Kit description: Single Oven Installation 3. For standard installation align the front flange of both left and right brackets to the front cabinet, using a flat surface as a tool. B D A. Left bracket B. Right bracket A C C. Front aesthetic panel D. Front flange of the bracket 1. Place left bracket on the cabinet floor, against the left cabinet wall. 2. Place the right bracket on the cabinet floor, against the right cabinet wall. A A A. Front flanges`` of the bracket of Single Oven For Flush installation: align the front aesthetic panel to the cabinet and place the bracket frontal flange against the rear side of the aesthetic panel. B A A. Left bracket B. Right bracket A A. Front aesthetic panel 4. Be sure to fix the two brackets in a horizontal position aligned to each other. 10
-
 1
1 -
2
-
3
-
4
-
 5
5 -
 6
6 -
 7
7 -
 8
8 -
 9
9 -
 10
10 -
 11
11 -
 12
12 -
 13
13 -
 14
14 -
 15
15 -
16
-
17
-
18
-
19
-
20
-
21
-
22
-
23
-
24
-
25
-
26
-
27
-
28
-
29
-
30
-
31
-
32
 |
 |
