KitchenAid KODC504PPS Installation Instructions - Page 14
Avoid unwanted fall of the parts inside the cabinet.
 |
View all KitchenAid KODC504PPS manuals
Add to My Manuals
Save this manual to your list of manuals |
Page 14 highlights
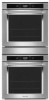
7. Place the spacer on top surface of the lower oven. NOTE: Avoid unwanted fall of the parts inside the cabinet. 9. Screw the aesthetic panel to the front flanges of the bracket using the remaining two 4 x 12 mm screws. A A. Spacer 8. Place the aesthetic panel on the spacer and align it horizontally with the lower oven. The fixing slots on the front flanges of brackets allow to adjust vertical and horizontal position of the aesthetic panel to match overall alignment. 10. Using two or more people, gently remove the lower oven outside the cabinet using the handles located on the right and left side of the oven. A B A. Front aesthetic panel B. Spacer Spacer allows to have a uniform vertical gap distribution between the aesthetic panel and the lower oven. After fixing the aesthetic panel with screws, spacer can be removed. 11. Using two or more people, lift the upper oven by the side handles located on the right and left side of the oven. Gently insert into the cabinet cutout, sliding it on top of the left and right brackets. 14
-
 1
1 -
2
-
3
-
4
-
5
-
6
-
7
-
8
-
 9
9 -
 10
10 -
 11
11 -
 12
12 -
 13
13 -
 14
14 -
 15
15 -
 16
16 -
 17
17 -
 18
18 -
 19
19 -
20
-
21
-
22
-
23
-
24
-
25
-
26
-
27
-
28
-
29
-
30
-
31
-
32
 |
 |
