KitchenAid KOSE500ESS Use & Care Guide - Page 11
Bakeware, Meat Thermometer, Oven Vents, Preheating and Oven Temperature
 |
View all KitchenAid KOSE500ESS manuals
Add to My Manuals
Save this manual to your list of manuals |
Page 11 highlights
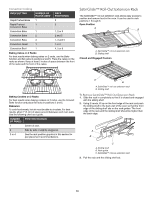
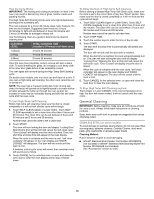
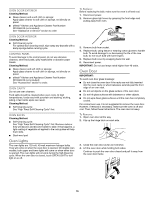
To Replace SatinGlide™ Roll-out Extension Rack 1. Using 2 hands, grasp the front of the closed rack and the sliding shelf. Place the closed rack and the sliding shelf on the rack guide. 2. Using 2 hands, lift up on the front edge of the rack and the sliding shelf together. 3. Slowly push the rack and the sliding shelf to the back of the oven until the back edge of the rack pulls over the end of the rack guide. To avoid damage to the sliding shelves, do not place more than 25 lbs (11.4 kg) on the rack. Do not clean the SatinGlide™ roll-out extension rack in a dishwasher. It may remove the rack's lubricant and affect its ability to slide. See the "General Cleaning" section for more information. Bakeware The bakeware material affects cooking results. Follow manufacturer's recommendations and use the bakeware size recommended in the recipe. Use the following chart as a guide. BAKEWARE/ RESULTS RECOMMENDATIONS Light colored aluminum ■ Use temperature and time ■ Light golden crusts recommended in recipe. ■ Even browning Dark aluminum and ■ May need to reduce baking other bakeware with temperatures slightly. dark, dull and/or nonstick finish ■ Use suggested baking time. ■ Brown, crisp crusts ■ For pies, breads and casseroles, use temperature recommended in recipe. ■ Place rack in center of oven. Insulated cookie sheets or baking pans ■ Little or no bottom browning ■ Follow rack recommendations in the "Position Racks and Bakeware" section. ■ May need to increase baking time. Stainless steel ■ Light, golden crusts ■ ■ Uneven browning May need to increase baking time. Stoneware/Baking stone ■ Crisp crusts ■ Follow manufacturer's instructions. Ovenproof glassware, ceramic glass or ceramic ■ May need to reduce baking temperatures slightly. ■ Brown, crisp crusts Meat Thermometer Not all models have a temperature probe. On models without a temperature probe, use a meat thermometer to determine whether meat, poultry and fish are cooked to the desired degree of doneness. The internal temperature, not appearance, should be used to determine doneness. Oven Vent(s) A B C D E F G Single and Double Oven A. Control panel B. Oven vent C. Single oven or upper double oven G. Bottom vent Double Oven D. Upper oven E. Oven vent F. Lower oven G. Bottom vent The oven vent(s) should not be blocked or covered since they allow the inlet of fresh air into the cooling system. Also, the bottom vent should not be blocked or covered since it allows the inlet of fresh air into the cooling system and the outlet of hot air from the cooling system. Blocking or covering vents will cause poor air circulation, affecting cooking, cleaning and cooling results. Preheating and Oven Temperature Preheating When beginning a Bake or Convect Bake cycle, the oven begins preheating after Start is touched. The oven will take approximately 12 to 17 minutes to reach 350°F (177°C) with all of the oven racks provided with your oven inside the oven cavity. Higher temperatures will take longer to preheat. The preheat cycle rapidly increases the oven temperature. The actual oven temperature will go above your set temperature to offset the heat lost when your oven door is opened to insert food. This ensures that when you place your food in the oven, the oven will begin at the proper temperature. Insert your food when the preheat tone sounds. Do not open the door during preheat until the tone sounds. Oven Temperature While in use, the oven elements will cycle on and off as needed to maintain a consistent temperature. They may run slightly hot or cool at any point in time due to this cycling. Opening the oven door while in use will release the hot air and cool the oven which could impact the cooking time and performance. It is recommended to use the oven light to monitor cooking progress. 11
-
 1
1 -
2
-
3
-
4
-
5
-
 6
6 -
 7
7 -
 8
8 -
 9
9 -
 10
10 -
 11
11 -
 12
12 -
 13
13 -
 14
14 -
 15
15 -
 16
16 -
17
-
18
-
19
-
20
-
21
-
22
-
23
-
24
-
25
-
26
-
27
-
28
-
29
-
30
-
31
-
32
-
33
-
34
-
35
-
36
-
37
-
38
-
39
-
40
-
41
-
42
-
43
-
44
 |
 |
