KitchenAid KOSE500ESS Use & Care Guide - Page 6
Electronic Oven Controls, Display, Start, Lower Cancel, Upper Cancel and Cancel
 |
View all KitchenAid KOSE500ESS manuals
Add to My Manuals
Save this manual to your list of manuals |
Page 6 highlights
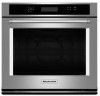
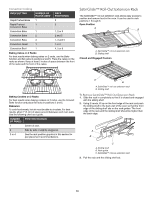
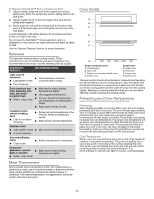
KEY CONVECT MODE PROOF STOP TIME COOK TIME FEATURE INSTRUCTIONS Convect broil Close the door. 1. Touch Upper or Lower CONVECT BROIL. Touch the number keys to enter a temperature other than 550°F (288°C). The convection broil range can be set between 450°F and 550°F (232°C and 288°C). 2. Touch START. The set oven temperature will appear on the oven display until oven is turned off. 3. Touch CANCEL for the selected oven when finished cooking. Proofing bread 1. Touch Upper or Lower PROOF. Display will show 100°F (38°C). 2. Touch START. Let dough rise until nearly doubled in size, and then check at 20 to 25 minutes. Proofing time may vary depending on dough type and quantity. 3. Touch CANCEL for the selected oven when finished cooking. Refer to the "Proofing Bread" section for more information. Delayed start The Stop Time key is used to enter the starting time for an oven function with a delayed start. Stop Time should not be used for foods such as breads and cakes because they may not bake properly. To set Cook Time or Stop Time, see the "Timed Cooking" section. Timed cooking Cook Time allows the oven to cook for a set length of time, and/or shut off automatically. To set Cook Time or Stop Time, see the "Timed Cooking" section. Electronic Oven Controls A B C D E F LK J A. Oven settings B. Oven display C. Number keys D. Kitchen timer E. Upper and lower oven cancel (double oven models) Cancel (single oven models) F. Start/control lock G. Oven light H. Self clean IH G I. Clock/Tools J. Convection cooking settings K. Stop time L. Cook Time Display When power is first supplied to the oven, the timer display will flash "12:00", and "Clock-Enter Time" will appear on the display. Enter the time by touching the number keys. Touch START to allow operation. To allow operation without setting a time, touch START or CANCEL. Oven Display When the oven(s) are in use, this display shows the oven temperature, heat source(s) and start time. On double oven models, this display will also show which oven is being set. The upper cavity symbol represents the upper oven; the lower cavity symbol represents the lower oven. In addition, during Timed Cooking, this display shows a time countdown and the stop time (if entered). Start The START key begins all oven functions except Sabbath Mode. If the Start key is not touched within 5 seconds after touching another key, "START?" will appear on the oven display as a reminder. If the Start key is not touched within 5 minutes after touching another key, the oven display will return to inactive mode and the programmed function will be canceled. Lower Cancel, Upper Cancel and Cancel The Lower Cancel, Upper Cancel and Cancel keys stop their respective oven functions except for the Clock, Kitchen Timer, and Control Lock. The oven cooling fan(s) may continue to operate even after an oven function has been canceled or completed, depending on the oven temperature. Time of Day, Timer Display When the oven(s) are not in use, this display shows the time of day or Timer countdown. 6
-
 1
1 -
 2
2 -
 3
3 -
 4
4 -
 5
5 -
 6
6 -
 7
7 -
 8
8 -
 9
9 -
 10
10 -
 11
11 -
 12
12 -
13
-
14
-
15
-
16
-
17
-
18
-
19
-
20
-
21
-
22
-
23
-
24
-
25
-
26
-
27
-
28
-
29
-
30
-
31
-
32
-
33
-
34
-
35
-
36
-
37
-
38
-
39
-
40
-
41
-
42
-
43
-
44
 |
 |