KitchenAid KPCG100OB Use & Care Guide - Page 19
Adjusting to Provide, Coarser Grinds - coffee burr grinder
 |
UPC - 883049061917
View all KitchenAid KPCG100OB manuals
Add to My Manuals
Save this manual to your list of manuals |
Page 19 highlights
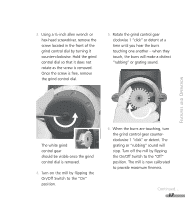
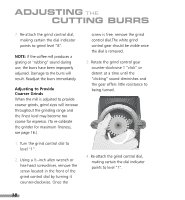
ADJUSTING THE CUTTING BURRS 7. Re-attach the grind control dial, making certain the dial indicator points to grind level "8". NOTE: If the coffee mill produces a grating or "rubbing" sound during use, the burrs have been improperly adjusted. Damage to the burrs will result. Readjust the burrs immediately. Adjusting to Provide Coarser Grinds When the mill is adjusted to provide coarser grinds, grind sizes will increase throughout the grinding range and the finest level may become too coarse for espresso. (To re-calibrate the grinder for maximum fineness, see page 16.) screw is free, remove the grind control dial.The white grind control gear should be visible once the dial is removed. 3. Rotate the grind control gear counter-clockwise 1 "click" or detent at a time until the "clicking" sound diminishes and the gear offers little resistance to being turned. 1. Turn the grind control dial to level "1". 2. Using a 5⁄32-inch allen wrench or hex-head screwdriver, remove the screw located in the front of the grind control dial by turning it counter-clockwise. Once the 4. Re-attach the grind control dial, making certain the dial indicator points to level "1". 18
-
 1
1 -
2
-
3
-
4
-
5
-
6
-
7
-
8
-
9
-
10
-
11
-
12
-
13
-
 14
14 -
 15
15 -
 16
16 -
 17
17 -
 18
18 -
 19
19 -
 20
20 -
 21
21 -
 22
22 -
 23
23 -
 24
24 -
25
-
26
-
27
-
28
-
29
-
30
-
31
-
32
-
33
-
34
-
35
-
36
-
37
-
38
 |
 |
