KitchenAid KPCG100OB Use & Care Guide - Page 27
the burr mounted on the burr-shaft
 |
UPC - 883049061917
View all KitchenAid KPCG100OB manuals
Add to My Manuals
Save this manual to your list of manuals |
Page 27 highlights
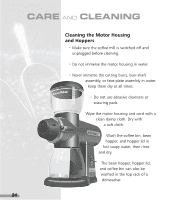
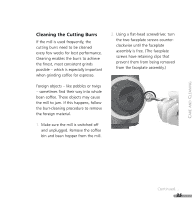
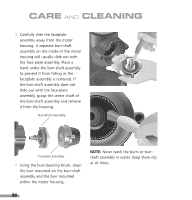
CARE AND CLEANING 3. Carefully slide the faceplate assembly away from the motor housing. A separate burr-shaft assembly on the inside of the motor housing will usually slide out with the face plate assembly. Place a hand under the burr-shaft assembly to prevent it from falling as the faceplate assembly is removed. If the burr-shaft assembly does not slide out with the face-plate assembly, grasp the center shaft of the burr-shaft assembly and remove it from the housing. Burr-Shaft Assembly Faceplate Assembly 4. Using the burr-cleaning brush, clean the burr mounted on the burr-shaft assembly and the burr mounted within the motor housing. NOTE: Never wash the burrs or burrshaft assembly in water. Keep them dry at all times. 26
-
 1
1 -
2
-
3
-
4
-
5
-
6
-
7
-
8
-
9
-
10
-
11
-
12
-
13
-
14
-
15
-
16
-
17
-
18
-
19
-
20
-
21
-
 22
22 -
 23
23 -
 24
24 -
 25
25 -
 26
26 -
 27
27 -
 28
28 -
 29
29 -
 30
30 -
 31
31 -
 32
32 -
33
-
34
-
35
-
36
-
37
-
38
 |
 |

3.
Carefully slide the faceplate
assembly away from the motor
housing. A separate burr-shaft
assembly on the inside of the motor
housing will usually slide out with
the face plate assembly. Place a
hand under the burr-shaft assembly
to prevent it from falling as the
faceplate assembly is removed. If
the burr-shaft assembly does not
slide out with the face-plate
assembly, grasp the center shaft of
the burr-shaft assembly and remove
it from the housing.
4.
Using the burr-cleaning brush, clean
the burr mounted on the burr-shaft
assembly and the burr mounted
within the motor housing.
NOTE:
Never wash the burrs or burr-
shaft assembly in water. Keep them dry
at all times.
26
CARE
AND
CLEANING
Faceplate Assembly
Burr-Shaft Assembly