KitchenAid KPES100PM User Guide
KitchenAid KPES100PM - Pro Line Espresso Maker Manual
 |
UPC - 050946933627
View all KitchenAid KPES100PM manuals
Add to My Manuals
Save this manual to your list of manuals |
KitchenAid KPES100PM manual content summary:
- KitchenAid KPES100PM | User Guide - Page 1
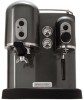
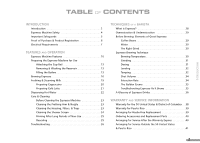
INTRODUCTION P R O L I N E™ S E R I E S MODEL KPES100 ESPRESSO MACHINE Introduction Section Contents Table of Contents 3 Espresso Machine Safety 4 Important Safeguards 5 Proof of Purchase & Registration.........6 Electrical Requirements 7 1 - KitchenAid KPES100PM | User Guide - Page 2
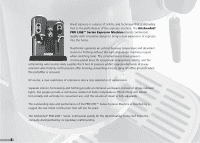
spray of coffee grounds when the portafilter is removed. Of course, a new experience of espresso is also PRO LINE™ Series Espresso Machine is matched by a rugged die-cast metal construction that will last for years. The KitchenAid® PRO LINE™ Series: commercial quality for the discriminating home - KitchenAid KPES100PM | User Guide - Page 3
Crema 35 Troubleshooting Espresso As It Brews 35 A Glossary of Espresso Drinks 36 WARRANTY AND SERVICE INFORMATION Warranty for the 50 United States & District of Columbia ....38 Warranty for Puerto Rico 39 Arranging for Hassle-Free Replacement 39 Ordering Accessories and Replacement Parts 40 - KitchenAid KPES100PM | User Guide - Page 4
ESPRESSO MACHINE SAFETY Your safety and the safety of others are very important. We have provided many important safety messages in this manual you don't immediately follow instructions. DANGER You can be killed or seriously injured if you don't follow instructions. WARNING All safety messages - KitchenAid KPES100PM | User Guide - Page 5
all instructions. parts, and before cleaning. 6. Do not operate any appliance with a damaged cord or plug, or after appliance malfunctions or has been damaged in any manner. Return the appliance to the nearest authorized service center for examination, repair or adjustment. 7. The use of accessory - KitchenAid KPES100PM | User Guide - Page 6
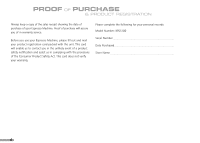
of the sales receipt showing the date of purchase of your Espresso Machine. Proof of purchase will assure you of in-warranty service. Before you use your Espresso Machine, please complete the following for your personal records: Model Number: KPES100 Serial Number Date Purchased Store Name 6 - KitchenAid KPES100PM | User Guide - Page 7
ELECTRICAL REQUIREMENTS Volts: 120 V.A.C. only. Hertz: 60 Hz NOTE: This Espresso Machine has a 3 prong grounded plug. To reduce the risk of electrical an adapter. Do not use an extension cord. Failure to follow these instructions can result in death, fire, or electrical shock. INTRODUCTION 7 - KitchenAid KPES100PM | User Guide - Page 8
- KitchenAid KPES100PM | User Guide - Page 9
I N E™ S E R I E S FEATURES AND OPERATION Features and Operation Section Contents Espresso Machine Features 10 Preparing for Use 13 Brewing Espresso 16 Frothing & Steaming Milk 19 Preparing Cappuccino 20 Preparing Café Latte 21 Dispensing Hot Water 22 Care & Cleaning 23 Troubleshooting 26 9 - KitchenAid KPES100PM | User Guide - Page 10
illuminated. Illustration to come Steam Dial Espresso Button Press the espresso button to activate the water pump for brewing espresso. To stop brewing, press the espresso button a second time. Frothing Boiler Temperature Gauge Model KPES100 Espresso Machine Hot Water Button When the steam dial - KitchenAid KPES100PM | User Guide - Page 11
right for easy filling, and features easy-tosee "max" and "min" fill lines. Translucent reservoir shows the water level at a glance. Reservoir can be washed espresso cups for warming. Stainless steel cup rail helps prevent breakage. Espresso Boiler Temperature Gauge Dial gauge indicates when espresso - KitchenAid KPES100PM | User Guide - Page 12
MODEL KPES100 ESPRESSO MACHINE FEATURES Portafilter Commercial-size portafilter features chrome-plated for frothing. Tamper Evenly tamps coffee into the filter basket. Coffee Scoop and Shower-Screen Brush Use one level scoop of coffee for each shot (ounce) of espresso. The shower-screen brush will - KitchenAid KPES100PM | User Guide - Page 13
runs dry during use (this can damage the espresso machine) • multiple beverages are steamed without brewing espresso or dispensing hot water 1. Slide the water reservoir left or right to expose the top, and fill with fresh cold water to the max fill line. NOTE: Distilled water or mineral water can - KitchenAid KPES100PM | User Guide - Page 14
to follow these instructions can result in death, fire, or electrical shock. 2. Insert the end of the electrical cord without prongs into the cord receptacle in the back of the espresso machine. 5. Press the On/Off Power Switch to turn the espresso machine on. When the espresso machine is on, the - KitchenAid KPES100PM | User Guide - Page 15
OPERATION 6. Place a coffee cup underneath the brew head. Do not attach the portafilter to the brew head. 7. Press the Espresso Button - it is ready for use. 11.If no espresso is desired at this time, press the On/Off Power Switch to turn the espresso machine off. 8. Place the frothing pitcher - KitchenAid KPES100PM | User Guide - Page 16
or large capacity filter basket. Use the small capacity basket for a single shot of espresso (1 oz.), and the large capacity basket for a double shot (2 oz.). The small capacity basket can be used with paper coffee pods. 3. Press the filter basket into the portafilter until it snaps into place. Do - KitchenAid KPES100PM | User Guide - Page 17
boiler temperature gauge needle climbs into the "ready" zone, the espresso machine is ready to brew. 7. Remove the portafilter from the brew head by moving the handle to the left. Place one level measure of ground coffee (or a paper coffee pod) in the small filter basket, or two measures of ground - KitchenAid KPES100PM | User Guide - Page 18
the portafilter, place a cup under the brew head and press the Espresso Button for a second or two. This cleans the shower screen and flushes any coffee oils and grounds that have migrated into the brew head. 13.To brew more espresso, repeat steps 6 through 12, but see the barista tips to the - KitchenAid KPES100PM | User Guide - Page 19
MILK Frothing and steaming milk requires a bit of practice, but you'll be surprised how quickly your skills will develop. The PRO LINE™ Series Espresso Machine gives you all the tools you need: an 81⁄2 ounce stainless steel pitcher shaped especially for frothing, a frothing arm that adjusts - KitchenAid KPES100PM | User Guide - Page 20
word cappuccino is derived from Capuchin, an order of monks who wear garments the color of this most popular espresso drink. A standard cappuccino is a combination of steamed milk and espresso that's capped with a layer of frothed milk; it's usually served in a bowl-shaped cup of 6 to 7 ounce volume - KitchenAid KPES100PM | User Guide - Page 21
drink with whipped cream and chocolate shavings, you'll have that chocolate and coffee lover's dream, the Café Mocha. To prepare a Café Latte, you will need a pitcher larger than the one supplied with the espresso machine. A 16 ounce capacity pitcher is perfect. Fill the pitcher 1⁄2 full with cold - KitchenAid KPES100PM | User Guide - Page 22
a cup or pitcher containing other ingredients may cause splattering. 1. Press the On/Off Power Switch to turn the espresso machine on. 2. Wait until the espresso machine has reached operating temperature; this will take about 6 minutes. When the frothing boiler temperature gauge needle climbs into - KitchenAid KPES100PM | User Guide - Page 23
CARE AND CLEANING FEATURES AND OPERATION Keeping the PRO LINE™ Series Espresso Machine clean is vital to brewing the best espresso possible. Stale coffee oils on the portafilter, filter baskets, and shower screen will ruin the flavor of the most expertly prepared coffee, and any milk left on the - KitchenAid KPES100PM | User Guide - Page 24
• Use the shower screen brush or a damp cloth to brush or wipe coffee grounds from the brew head gasket and shower screen. 1. Using a short Phillips head. Cleaning the Shower Screen Once every 75 to 100 shots of espresso, the shower screen should be removed from the brew head to clean thoroughly - KitchenAid KPES100PM | User Guide - Page 25
ensure that the boilers are filled and the espresso machine is ready to operate. 1. Remove the reservoir, empty any stale water, replace, and fill the reservoir with fresh water to the max fill line. 2. Fill the boilers with the fresh water. For instructions, see "Fill and Rinse the Boilers" on page - KitchenAid KPES100PM | User Guide - Page 26
, or the frothing boiler may not be filled If the problem cannot be fixed with the steps above, see the KitchenAid Warranty and Service section on page 37.* *DO NOT return the Espresso Machine to the retailer - they do not provide service. • If the water pump is noisy, the... - water reservoir may - KitchenAid KPES100PM | User Guide - Page 27
TECHNIQUES OF A BARISTA P R O L I N E™ S E R I E S TECHNIQUES OF A BARISTA Techniques of a Barista Section Contents What is Espresso 28 Overextraction & Underextraction ....29 Elements of Great Espresso 29 Espresso Brewing Technique 30 A Glossary of Espresso Drinks ...........36 27 - KitchenAid KPES100PM | User Guide - Page 28
the electric water pump. Through the decades, the elements of espresso brewing were tested and refined to produce the standards we have today: one ounce of true espresso comes from exposing 1⁄4 ounce (7 grams) of finely ground and packed coffee to 195-205º F water under 130 lbs. (9 bars) of pressure - KitchenAid KPES100PM | User Guide - Page 29
the barista's technique. Before Brewing: The Elements of Great Espresso Before the espresso machine is even plugged in, you'll need several elements to produce great coffee. Fresh Coffee Beans Great coffee can only come from fresh coffee beans, properly roasted. Many baristas recommend buying beans - KitchenAid KPES100PM | User Guide - Page 30
water - they can damage the espresso machine. The Right Grind - and Grinder Espresso demands a very fine, very consistent espresso. The best espresso requires a quality burr grinder, like the PRO LINE™ Series Burr Coffee Mill. A good burr grinder will maximize the flavor and aroma of espresso - KitchenAid KPES100PM | User Guide - Page 31
is the process of measuring ground coffee into the filter basket. A single shot of espresso requires 1⁄4 ounce (7 grams) of coffee - a double shot, twice that. If filled level with finely ground coffee, the scoop included with the PRO LINE™ Series Espresso Machine is a near perfect measure for one - KitchenAid KPES100PM | User Guide - Page 32
called a puck) that provides uniform resistance to the high-pressure brew water. Properly leveled and tamped coffee will produce an even extraction of coffee compounds - and great espresso. Coffee that is tamped too softly will be deformed by the brew water, resulting in uneven extraction, a fast - KitchenAid KPES100PM | User Guide - Page 33
firmly against the palm. When tamping, try to keep the tamper, wrist, and elbow in a straight line. 4. Apply a second, finishing tamp (also called a polishing tamp). Press straight down on the coffee with about 35 pounds of pressure, then relax the force slightly (to about 20 pounds) and polish - KitchenAid KPES100PM | User Guide - Page 34
if it starts to lighten. Espresso Ristretto is espresso brewed with less than normal shot volume. Prepare the espresso machine to brew a double shot extraction rate. The best solution is to invest in the KitchenAid® PRO LINE™ Series Coffee Mill. If this isn't possible, experiment with the tamping - KitchenAid KPES100PM | User Guide - Page 35
, the dense golden foam of emulsified coffee oils that captures the essence of coffee flavor. Good crema should be thick and cling to the side of the cup when it's tilted; the best crema should be able to support a sprinkling of sugar for nearly 30 seconds. Troubleshooting Espresso As It Brews As it - KitchenAid KPES100PM | User Guide - Page 36
DRINKS Americano 6 to 8 ounces of hot water added to a single shot of espresso. This makes a superb cup of coffee. Café Latte 8 to 10 ounces of steamed milk added to a single shot of espresso. Lattes are often flavored with 1 to 2 ounces of syrup. Café Mocha A café latte with several ounces - KitchenAid KPES100PM | User Guide - Page 37
Warranty Information Section Contents Warranty for the U.S 38 Warranty for Puerto Rico 39 Arranging for Hassle-Free Replacement 39 Ordering Accessories and Replacement Parts 40 Arranging for Service After the Warranty Expires 40 Arranging for Service Outside the U.S. & Puerto Rico 41 37 - KitchenAid KPES100PM | User Guide - Page 38
toll-free at 1-800-541-6390. OR The replacement parts and repair labor costs to correct defects in materials and workmanship. Service must be provided by an Authorized KitchenAid Service Center. See the KitchenAid® PRO LINE™ Series Espresso Machine Warranty for Puerto Rico for details on how to - KitchenAid KPES100PM | User Guide - Page 39
RICO A limited two year warranty extends to the purchaser and any succeeding owner for PRO LINE™ Series Espresso Machines operated in Puerto Rico. During the warranty period, all service must be handled by an Authorized KitchenAid Service Center. Please bring the Espresso Machine, or ship it - KitchenAid KPES100PM | User Guide - Page 40
ORDERING ACCESSORIES AND REPLACEMENT PARTS To order accessories or replacement parts for your Espresso Machine, call toll-free 1-800-541-6390 Monday through Friday, 8 a.m. to 8 p.m. (Eastern Time), or Saturday, 10 a.m. to 5 p.m., or write to: Customer Satisfaction Center, KitchenAid Portable - KitchenAid KPES100PM | User Guide - Page 41
WARRANTY AND SERVICE INFORMATION ARRANGING FOR SERVICE OUTSIDE THE 50 UNITED STATES AND PUERTO RICO Consult your local KitchenAid dealer or the store where you purchased your PRO LINE™ Series Espresso Machine for information on how to obtain service. 41 - KitchenAid KPES100PM | User Guide - Page 42
-
 1
1 -
 2
2 -
 3
3 -
 4
4 -
 5
5 -
 6
6 -
 7
7 -
8
-
9
-
10
-
11
-
12
-
13
-
14
-
15
-
16
-
17
-
18
-
19
-
20
-
21
-
22
-
23
-
24
-
25
-
26
-
27
-
28
-
29
-
30
-
31
-
32
-
33
-
34
-
35
-
36
-
37
-
38
-
39
-
40
-
41
-
42
 |
 |
MODEL
KPES100
ESPRESSO MACHINE
Table of Contents
...............................
3
Espresso Machine Safety
.....................
4
Important Safeguards
.........................
5
Proof of Purchase & Registration
.........
6
Electrical Requirements
.......................
7
Introduction
Section Contents
P
RO
L
INE
™
S
ERIES
1
I
NTRODUCTION