KitchenAid KVIB606DBS Installation Guide - Page 10
Install the lower duct cover rear to the range hood canopy.
 |
View all KitchenAid KVIB606DBS manuals
Add to My Manuals
Save this manual to your list of manuals |
Page 10 highlights
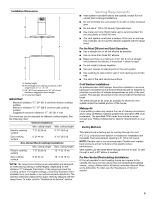
NOTE: For non-vented (recirculating) installation, the slotted holes in the upper duct covers will be visible when assembled. For vented installations, the slotted holes will be hidden down inside the lower duct covers. A 5. Install the lower duct cover (front) to the range hood canopy. Spread the lower duct cover opening slightly and position it over the upper duct cover. Set the lower duct cover in place. Position so the flanges of the lower duct cover set into the flanges of the upper duct covers. D C B C A. Top toward ceiling B. Slots installed up for non-vented installations C. Slots installed down for vented installations 3. Slide the upper duct covers up the frame to the ceiling, and then secure to the upper horizontal support with 2 - 3.5 x 6.5 mm screws. B A C A B A. Range hood canopy B. Plastic clips C. Lower duct covers D. Upper duct covers 6. Install the lower duct cover (rear) to the range hood canopy. Spread the lower duct cover opening slightly and position it over the upper duct cover. Set the lower duct cover in place. Position so the flanges of the lower duct cover set into the flanges of the upper duct cover. Make sure the front and rear lower duct covers mate properly. NOTE: When assembling the rear lower duct cover to the front lower duct cover, the flange (both sides) must be placed over the plastic clip to secure the lower duct covers together at the bottom. D A D B A. 3.5 x 6.5 mm screw B. Slotted holes (2) C. Upper duct covers D. Ceiling 4. Place the long end of the plastic clips (2) into the bottom of the front lower duct cover. C A. Lower duct cover (rear) B. Plastic clips C. Lower duct covers D. Upper duct covers 7. Secure the lower duct covers together at the top using plastic clips (2). Use one plastic clip on each side. A B A B A. Lower duct cover - (front) B. Plastic clips (2) (long end for front placement) 10 A. Plastic clips (2) B. Lower duct covers top clip area
-
 1
1 -
2
-
3
-
4
-
 5
5 -
 6
6 -
 7
7 -
 8
8 -
 9
9 -
 10
10 -
 11
11 -
 12
12 -
 13
13 -
 14
14 -
 15
15 -
16
-
17
-
18
-
19
-
20
-
21
-
22
-
23
-
24
-
25
-
26
-
27
-
28
-
29
-
30
-
31
-
32
 |
 |
