KitchenAid KVIB606DSS Use & Care Guide - Page 14
Range Hood Use
 |
View all KitchenAid KVIB606DSS manuals
Add to My Manuals
Save this manual to your list of manuals |
Page 14 highlights
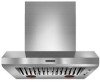
2. Secure the lower chimney covers to the range hood canopy using 4 - 4.2 x 8 mm screws. A B G C D F A. Lower chimney covers B. Range hood canopy C. 4 - 4.2 x 8 mm screws Complete Installation and Check Operation 1. Install grease filters. See "Range Hood Care" section. 2. Check operation of the range hood blower and lights. See "Range Hood Use" section. A. Halogen lights B. Blower control switches C. Halogen light switch D. Heat lamp switch E E. Heat lamps F. Grease filter G. Grease filter handles 3. If range hood does not operate, check to see whether a circuit breaker has tripped or a household fuse has blown. Disconnect power supply and check that the wiring is correct. NOTE: To get the most efficient use from your new range hood, read the "Range Hood Use" section. RANGE HOOD USE The range hood is designed to remove smoke, cooking vapors and odors from the cooktop area. For best results, start the range hood before cooking and allow it to operate several minutes after the cooking is complete to clear all smoke and odors from the kitchen. The range hood controls are located on the underside of the range hood. 2. Move the fan switch to the "Off" position to turn the fan OFF. Auto On Fan The range hood is equipped with a sensor to automatically turn on the fan when excessive heat is detected in the control area. When the fan switch is in the "Off" position, this sensor will turn the fan to high speed when necessary. When the heat decreases, the fan will turn off. When the fan switch is in the "On" position, the heat sensor is not active and the range hood functions normally. A B C A. Light control B. Blower control C. Fan speed control Range Hood Controls Operating the light 1. Move the light switch to the "1" position to turn range hood light to night light setting. 2. Move the light switch to the "2" position to turn range hood light to full light setting. 3. Move the light switch to the "Off" position to turn range hood light OFF. Operating the fan 1. Move the fan switch to the "On" position to turn the fan ON. The fan will begin operating at the speed set on the fan speed switch. Adjusting the fan The fan has 3 speed controls. Move the fan speed switch to "1" position for low speed, "2" position for medium speed, or "3" position for high speed. Thermal Protector The range hood is equipped with a thermal protector to avoid overheating conditions. If the range hood shuts off while in use, move fan slider switch to Off to turn off the range hood. Wait approximately 60 minutes, then move slider to On to restart the range hood. Operating the heat lamp The heat lamps are designed to keep food warm prior to serving. The cooktop surface is too far away from the heat lamp to be used as a shelf. For best results, install a metal shelf to hold the food closer to the lamps. The optimum distance between the shelf and the range hood is 12" (30.5 cm) to 15" (38.1 cm). 14
-
 1
1 -
2
-
3
-
4
-
5
-
6
-
7
-
8
-
 9
9 -
 10
10 -
 11
11 -
 12
12 -
 13
13 -
 14
14 -
 15
15 -
 16
16 -
 17
17 -
 18
18 -
 19
19 -
20
-
21
-
22
-
23
-
24
-
25
-
26
-
27
-
28
-
29
-
30
-
31
-
32
-
33
-
34
-
35
-
36
 |
 |
