Konica Minolta AccurioPress C2060 AccurioPress C2070/C2070P/C2060/Print C2060L - Page 113
Press [Print Mode]., press [OK].
 |
View all Konica Minolta AccurioPress C2060 manuals
Add to My Manuals
Save this manual to your list of manuals |
Page 113 highlights
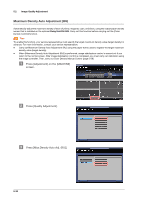
% Press [Print Mode]. AccurioPress C2070/C2070P/C2060 AccurioPrint C2060L & Load the paper that has been used to register the target density into the tray. The paper profile of the tray is automatically switched to the paper profile that has been used to register the target density. ' Select the tray containing paper, then press [OK]. ( Press Start on the control panel. A chart applied the Screen 1 (Dot190 Recommended) is Output, and auto adjustment is performed. When the adjustment is completed, you return to the [Maximum Density Auto Adjustment (RU)] screen. Adjustment processing cannot be stopped until all charts are printed out. 5 5-31
-
 1
1 -
2
-
3
-
4
-
5
-
6
-
7
-
8
-
9
-
10
-
11
-
12
-
13
-
14
-
15
-
16
-
17
-
18
-
19
-
20
-
21
-
22
-
23
-
24
-
25
-
26
-
27
-
28
-
29
-
30
-
31
-
32
-
33
-
34
-
35
-
36
-
37
-
38
-
39
-
40
-
41
-
42
-
43
-
44
-
45
-
46
-
47
-
48
-
49
-
50
-
51
-
52
-
53
-
54
-
55
-
56
-
57
-
58
-
59
-
60
-
61
-
62
-
63
-
64
-
65
-
66
-
67
-
68
-
69
-
70
-
71
-
72
-
73
-
74
-
75
-
76
-
77
-
78
-
79
-
80
-
81
-
82
-
83
-
84
-
85
-
86
-
87
-
88
-
89
-
90
-
91
-
92
-
93
-
94
-
95
-
96
-
97
-
98
-
99
-
100
-
101
-
102
-
103
-
104
-
105
-
106
-
107
-
 108
108 -
 109
109 -
 110
110 -
 111
111 -
 112
112 -
 113
113 -
 114
114 -
 115
115 -
 116
116 -
 117
117 -
 118
118 -
119
-
120
-
121
-
122
-
123
-
124
-
125
-
126
-
127
-
128
-
129
-
130
-
131
-
132
-
133
-
134
-
135
-
136
-
137
-
138
-
139
-
140
-
141
-
142
-
143
-
144
-
145
-
146
-
147
-
148
-
149
-
150
-
151
-
152
-
153
-
154
-
155
-
156
-
157
-
158
-
159
-
160
-
161
-
162
-
163
-
164
-
165
-
166
-
167
-
168
-
169
-
170
-
171
-
172
-
173
-
174
-
175
-
176
-
177
-
178
-
179
-
180
-
181
-
182
-
183
-
184
-
185
-
186
-
187
-
188
-
189
-
190
-
191
-
192
-
193
-
194
-
195
-
196
-
197
-
198
-
199
 |
 |

5-31
AccurioPrint C2060L
5
AccurioPress C2070/C2070P/C2060
D
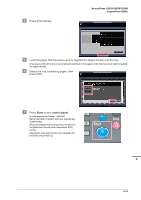
Press [Print Mode].
E
Load the paper that has been used to register the target density into the tray.
The paper profile of the tray is automatically switched to the paper profile that has been used to register
the target density.
F
Select the tray containing paper, then
press [OK].
G
Press
Start
on the
control panel
.
A chart applied the Screen 1 (Dot190
Recommended) is Output, and auto adjustment
is performed.
When the adjustment is completed, you return to
the [Maximum Density Auto Adjustment (RU)]
screen.
Adjustment processing cannot be stopped until
all charts are printed out.