Konica Minolta AccurioPress C2070/2070P AccurioPress C2070/C2070P/C2060/Print - Page 162
Step 5: Send scan data to a public folder, Convenient Use of Scan Function Scan to SMB
 |
View all Konica Minolta AccurioPress C2070/2070P manuals
Add to My Manuals
Save this manual to your list of manuals |
Page 162 highlights
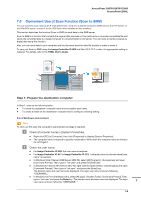
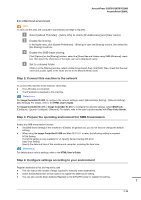
7.3 Convenient Use of Scan Function (Scan to SMB) Reference For details about how to register destinations, refer to the HTML User's Guide. Step 5: Send scan data to a public folder Send scan data to a public folder of the registered SMB server. In the [SCAN] screen of this machine, select an SMB destination, configure the scan conditions, then press Start. Reference You can specify conditions such as the image quality and scanning size. For details about scan conditions, refer to the HTML User's Guide. 7-11
-
 1
1 -
2
-
3
-
4
-
5
-
6
-
7
-
8
-
9
-
10
-
11
-
12
-
13
-
14
-
15
-
16
-
17
-
18
-
19
-
20
-
21
-
22
-
23
-
24
-
25
-
26
-
27
-
28
-
29
-
30
-
31
-
32
-
33
-
34
-
35
-
36
-
37
-
38
-
39
-
40
-
41
-
42
-
43
-
44
-
45
-
46
-
47
-
48
-
49
-
50
-
51
-
52
-
53
-
54
-
55
-
56
-
57
-
58
-
59
-
60
-
61
-
62
-
63
-
64
-
65
-
66
-
67
-
68
-
69
-
70
-
71
-
72
-
73
-
74
-
75
-
76
-
77
-
78
-
79
-
80
-
81
-
82
-
83
-
84
-
85
-
86
-
87
-
88
-
89
-
90
-
91
-
92
-
93
-
94
-
95
-
96
-
97
-
98
-
99
-
100
-
101
-
102
-
103
-
104
-
105
-
106
-
107
-
108
-
109
-
110
-
111
-
112
-
113
-
114
-
115
-
116
-
117
-
118
-
119
-
120
-
121
-
122
-
123
-
124
-
125
-
126
-
127
-
128
-
129
-
130
-
131
-
132
-
133
-
134
-
135
-
136
-
137
-
138
-
139
-
140
-
141
-
142
-
143
-
144
-
145
-
146
-
147
-
148
-
149
-
150
-
151
-
152
-
153
-
154
-
155
-
156
-
 157
157 -
 158
158 -
 159
159 -
 160
160 -
 161
161 -
 162
162 -
 163
163 -
 164
164 -
 165
165 -
 166
166 -
 167
167 -
168
-
169
-
170
-
171
-
172
-
173
-
174
-
175
-
176
-
177
-
178
-
179
-
180
-
181
-
182
-
183
-
184
-
185
-
186
-
187
-
188
-
189
-
190
-
191
-
192
-
193
-
194
-
195
-
196
-
197
-
198
-
199
 |
 |

7-11
7.3
Convenient Use of Scan Function (Scan to SMB)
Reference
For details about how to register destinations, refer to the
HTML User's Guide
.
Step 5: Send scan data to a public folder
Send scan data to a public folder of the registered SMB server.
In the [SCAN] screen of this machine, select an SMB destination, configure the scan conditions, then press
Start
.
Reference
You can specify conditions such as the image quality and scanning size. For details about scan conditions, refer to
the
HTML User's Guide
.