Konica Minolta AccurioPress C3080 AccurioPress C2070/C3080 Series Daily Mainte - Page 154
About Exact Color calibration
 |
View all Konica Minolta AccurioPress C3080 manuals
Add to My Manuals
Save this manual to your list of manuals |
Page 154 highlights
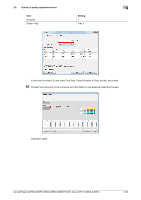
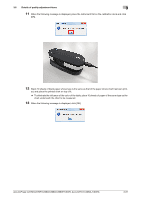
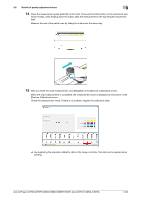
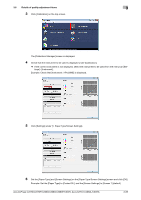
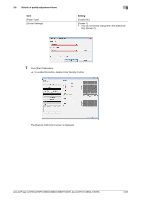
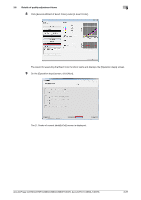
3.6 Details of quality adjustment items 3 16 Click [OK] on the [Information] screen. The calibration table is registered in the image controller. 17 Check the graph display and other information on the [Calibration Manager] screen. After checking the displayed content, click [Check the Status]. 18 On the [Confirm all registrations] screen, check the registered paper type, registration date/time, and other details. 3.6.14 About Exact Color calibration In addition to the regular controller calibration, measure the accuracy and check the Gray Step (gray balance) measurement result as necessary. Based on the color difference ΔE for gray color standard state in the color space, execute the advanced controller calibration (Exact Color) wizard as necessary. The following two methods are available to perform Exact Color. - Manual adjustment by using Color Centro - Automatic adjustment by using the touch panel . Meaning and Purpose of Advanced Controller Calibration (Exact Color) AccurioPress C2070/C2070P/C2060/C3080/C3080P/C3070, AccurioPrint C2060L/C3070L 3-83
-
 1
1 -
2
-
3
-
4
-
5
-
6
-
7
-
8
-
9
-
10
-
11
-
12
-
13
-
14
-
15
-
16
-
17
-
18
-
19
-
20
-
21
-
22
-
23
-
24
-
25
-
26
-
27
-
28
-
29
-
30
-
31
-
32
-
33
-
34
-
35
-
36
-
37
-
38
-
39
-
40
-
41
-
42
-
43
-
44
-
45
-
46
-
47
-
48
-
49
-
50
-
51
-
52
-
53
-
54
-
55
-
56
-
57
-
58
-
59
-
60
-
61
-
62
-
63
-
64
-
65
-
66
-
67
-
68
-
69
-
70
-
71
-
72
-
73
-
74
-
75
-
76
-
77
-
78
-
79
-
80
-
81
-
82
-
83
-
84
-
85
-
86
-
87
-
88
-
89
-
90
-
91
-
92
-
93
-
94
-
95
-
96
-
97
-
98
-
99
-
100
-
101
-
102
-
103
-
104
-
105
-
106
-
107
-
108
-
109
-
110
-
111
-
112
-
113
-
114
-
115
-
116
-
117
-
118
-
119
-
120
-
121
-
122
-
123
-
124
-
125
-
126
-
127
-
128
-
129
-
130
-
131
-
132
-
133
-
134
-
135
-
136
-
137
-
138
-
139
-
140
-
141
-
142
-
143
-
144
-
145
-
146
-
147
-
148
-
 149
149 -
 150
150 -
 151
151 -
 152
152 -
 153
153 -
 154
154 -
 155
155 -
 156
156 -
 157
157 -
 158
158 -
 159
159 -
160
-
161
-
162
-
163
-
164
-
165
-
166
-
167
-
168
-
169
-
170
-
171
-
172
-
173
-
174
-
175
-
176
-
177
-
178
 |
 |
