Konica Minolta Kodak i620 User Guide - Page 11
Attaching the power cord, Powering up the host computer, Scanner components, Powering up the host
 |
View all Konica Minolta Kodak i620 manuals
Add to My Manuals
Save this manual to your list of manuals |
Page 11 highlights
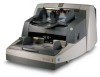
Attaching the power cord The Kodak i600 Series Scanner is packed with a set of power cords. 1. Select the power cord which complies with your electrical requirements and attach it. 2. Turn on the scanner and wait until the top green LED is lit indicating the scanner has completed power-up self-test and is idle. Powering up the host computer • Turn the power on to the host computer. Scanner components Front view 10 5 12* 4 3 6 1 11 2 7 9 8 1 Elevator tray extender - open the elevator tray extender to accommodate long documents. 2 Feed module - provides smooth document feeding of various sizes, thicknesses and textures. CAUTION:Moving parts, avoid contact. 3 Elevator tray side guides - slide the guides in or out to accommodate the document size you want to scan. Side guides can be left-, center- and right-adjusted to accommodate documents of various widths. The side guides can also be locked into position if desired. 4 Gap Release lever - allows you to manually adjust the space between the feed module and separation roller for documents that require special handling. 5 Output tray and End stop - collects the scanned documents. The output tray width and end stop length can be adjusted. 6 POD release latch - push up the POD release latch when you need to access the inside of the scanner. A-61500 April 2007 2-3
-
 1
1 -
2
-
3
-
4
-
5
-
 6
6 -
 7
7 -
 8
8 -
 9
9 -
 10
10 -
 11
11 -
 12
12 -
 13
13 -
 14
14 -
 15
15 -
 16
16 -
17
-
18
-
19
-
20
-
21
-
22
-
23
-
24
-
25
-
26
-
27
-
28
-
29
-
30
-
31
-
32
-
33
-
34
-
35
-
36
-
37
-
38
-
39
-
40
-
41
-
42
-
43
-
44
-
45
-
46
-
47
-
48
-
49
-
50
-
51
-
52
-
53
-
54
-
55
-
56
-
57
-
58
-
59
-
60
-
61
-
62
-
63
-
64
-
65
-
66
-
67
-
68
-
69
-
70
 |
 |