Konica Minolta bizhub C3350 bizhub C3850/C3350 Maintenance/Troubleshooting Use - Page 74
Error messages, Load paper into Tray X.
 |
View all Konica Minolta bizhub C3350 manuals
Add to My Manuals
Save this manual to your list of manuals |
Page 74 highlights
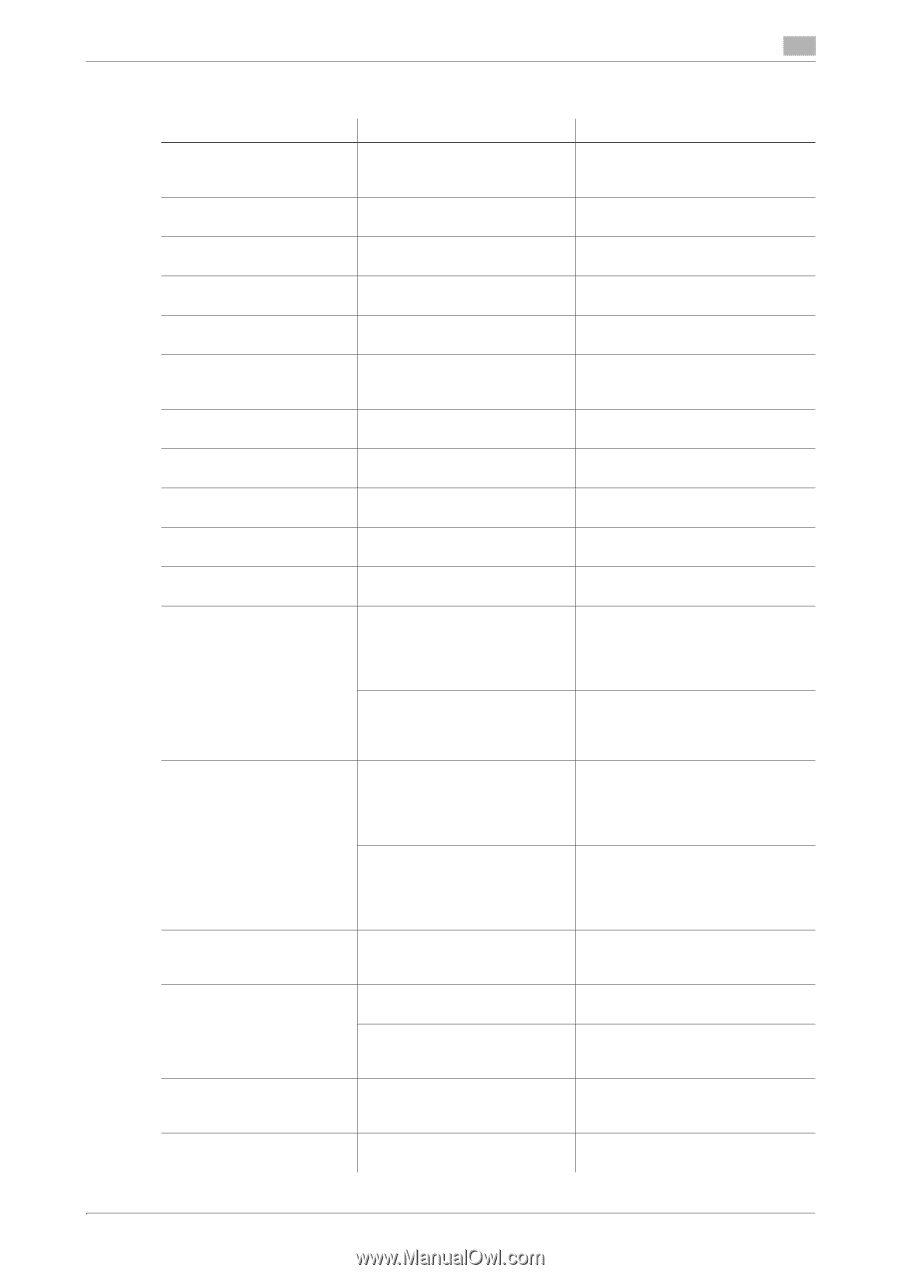
4.8 Major messages and actions 4 Error messages Message [Configuration of options has been changed.] [There is an open component.] [Paper Jam] [Imaging Unit Installation Error] [Fusing Unit Installation Error] [Install toner cartridge.] [Waste Toner Box Full] [Replace imaging unit] [Replenish Toner] [Paper Size Mismatch] [Replenish Paper] [Paper Empty] [Paper Size/Type Mismatch] [Output Tray Full] [Memory Overflow] [Stored Job Error] [HDD Capacity Over] Description The option configuration was changed while the power was turned on. The cover is opened. Remedy Restart this machine. Close the cover. A paper jam has occurred. The Imaging Unit is not installed correctly. The Fusing Unit is not installed correctly. The Toner Cartridge is not installed correctly. The Waste Toner Bottle has become full. The operating life of the Imaging Unit has expired. Toner is depleted. Paper of the specified size is not loaded into a tray. No paper is loaded in the tray. A print job was executed by specifying the Manual Feed Tray from the printer driver, but no paper was loaded in the Manual Feed Tray. A print job was executed by specifying Tray X from the printer driver, but no paper was loaded in Tray trayX. The size and type of the paper loaded in the tray specified from the printer driver are different from those of the paper loaded in the tray on the main unit. The size and type of the paper in the tray that are specified on the Control Panel do not match those of the paper actually loaded in the tray. The amount of paper output to the Output Tray has reached the maximum. Data has been received over the maximum memory size. All the available space in memory has been used up by document scanning. The option configuration is different from that specified when a job was saved. The HDD capacity has become full. Check a paper jam location, then remove the jammed paper. Install the Imaging Unit correctly. Install the Fusing Unit, then close all doors. Correctly install the Toner Cartridge, and close all doors. For details, refer to page 2-3. Replace the Waste Toner Bottle. For details, refer to page 2-12. Replace the Imaging Unit. For details, refer to page 2-7. Replace the Toner Cartridge. For details, refer to page 2-3. Load the correct paper into the displayed tray. Add paper to the tray, or change the tray to make prints. Load paper into the Manual Feed Tray. Load paper into Tray X. Load the paper of the appropriate size and type into the tray, then specify the correct size and type for the loaded paper on the Control Panel. Load the paper of the appropriate size and type into the tray, then specify the correct size and type for the loaded paper on the Control Panel. Remove the paper from the Output Tray. Cancel the job to reduce the amount of data, then execute the job again. Reduce the amount of original data. Return to the option configuration specified when a job was saved. Delete data saved on the HDD, if necessary. [Maintenance/Troubleshooting] 4-17
-
 1
1 -
2
-
3
-
4
-
5
-
6
-
7
-
8
-
9
-
10
-
11
-
12
-
13
-
14
-
15
-
16
-
17
-
18
-
19
-
20
-
21
-
22
-
23
-
24
-
25
-
26
-
27
-
28
-
29
-
30
-
31
-
32
-
33
-
34
-
35
-
36
-
37
-
38
-
39
-
40
-
41
-
42
-
43
-
44
-
45
-
46
-
47
-
48
-
49
-
50
-
51
-
52
-
53
-
54
-
55
-
56
-
57
-
58
-
59
-
60
-
61
-
62
-
63
-
64
-
65
-
66
-
67
-
68
-
 69
69 -
 70
70 -
 71
71 -
 72
72 -
 73
73 -
 74
74 -
 75
75 -
 76
76 -
 77
77 -
 78
78 -
 79
79 -
80
-
81
 |
 |