Konica Minolta bizhub C754 bizhub C654/C754 Fax Operations User Guide - Page 141
To display: [Utility] - [Administrator Settings] - [One-Touch/User Box Registration] - [Create One-Touch Des
 |
View all Konica Minolta bizhub C754 manuals
Add to My Manuals
Save this manual to your list of manuals |
Page 141 highlights
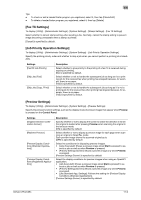
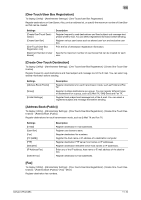
11 Settings [No.] [Name] [Sort Character] [Index] [Fax Number] [Line Setting] Description Destination registration number.[No.] is automatically registered using an unused smaller number. If you want to specify a number, tap [No.] and enter the number within the range of 1 to 2000. Enter the destination name that appears on the Touch Panel (using up to 24 characters). Assign a name that helps you easily identify the destination. Enter the same name as the registered (using up to 24 characters). You can sort destinations by registration name. Select a corresponding character so that the destination can be indexsearched by registration name. • If an alphabet character is specified for the initial of a registration name, search text is automatically specified with the alphabet character. If anything other than alphabet character is specified for the initial of a registration name, [etc] is specified by default. • For a frequently used destination, also select [Favorites]. If [Favorites] is selected, the destination will appear in the main screen of the fax/scan mode, enabling the user to easily select a destination. Enter a destination fax number. • When you use this machine in a PBX environment, tap [Outside] ([E-] appears). A registered outside line number is automatically inserted. • When you use this machine in a PBX environment, press [Pause] fol- lowing the outside line number ([P] appears) to ensure the dialing. • If you want to send out a push signal over the dial line, tap [Tone] ([T] appears). • Press [-] to separate a dial number. This does not affect the dialing of the number. As necessary, specify how to send a fax to a destination you want to register. You can change the settings you made here before sending a fax. • [Overseas TX]: Used to send a fax to areas where communication con- ditions are poor. Faxes are sent at a lower speed. • [ECM OFF]: Generally, faxes are sent while checking that the fax data is free of errors by using ECM (Error Correction Mode). To reduce the time required to send a fax, tap [ECM OFF]. • [V34 OFF]: Generally, faxes are sent in the Super G3 mode. If it is not possible to send faxes in the Super G3 mode, tap [V34 OFF]. • [Check Dest. & Send]: When using the Check Dest. And Send function, select [Yes]. The fax number specified for fax is checked against the remote fax number (CSI) and the fax is only sent when they match. • [Select Line]: If two lines are used, select the line used to send a fax. If [Unset] is selected, either line, whichever is not busy, is used for transmission. Tips - To check the settings for a registered destination, select its registered name, then tap [Check Job Set.]. - To change the settings for a registered destination, select its registered name, then tap [Edit]. - To delete a registered destination, select its registered name, then tap [Delete]. Related setting (for the administrator) - You can select whether to have the user enter a fax number twice when registering the fax number (De- fault: [OFF]). This is helpful to prevent the fax number from being incorrectly registered. For details, refer to page 11-21. [Group] To display: [Utility] - [Administrator Settings] - [One-Touch/User Box Registration] - [Create One-Touch Destination] - [Group] - [New] Register multiple destinations as a group. You can register different types of destinations for a group, such as E-Mail TX, SMB Send and Fax TX. bizhub C754/C654 11-11
-
 1
1 -
2
-
3
-
4
-
5
-
6
-
7
-
8
-
9
-
10
-
11
-
12
-
13
-
14
-
15
-
16
-
17
-
18
-
19
-
20
-
21
-
22
-
23
-
24
-
25
-
26
-
27
-
28
-
29
-
30
-
31
-
32
-
33
-
34
-
35
-
36
-
37
-
38
-
39
-
40
-
41
-
42
-
43
-
44
-
45
-
46
-
47
-
48
-
49
-
50
-
51
-
52
-
53
-
54
-
55
-
56
-
57
-
58
-
59
-
60
-
61
-
62
-
63
-
64
-
65
-
66
-
67
-
68
-
69
-
70
-
71
-
72
-
73
-
74
-
75
-
76
-
77
-
78
-
79
-
80
-
81
-
82
-
83
-
84
-
85
-
86
-
87
-
88
-
89
-
90
-
91
-
92
-
93
-
94
-
95
-
96
-
97
-
98
-
99
-
100
-
101
-
102
-
103
-
104
-
105
-
106
-
107
-
108
-
109
-
110
-
111
-
112
-
113
-
114
-
115
-
116
-
117
-
118
-
119
-
120
-
121
-
122
-
123
-
124
-
125
-
126
-
127
-
128
-
129
-
130
-
131
-
132
-
133
-
134
-
135
-
 136
136 -
 137
137 -
 138
138 -
 139
139 -
 140
140 -
 141
141 -
 142
142 -
 143
143 -
 144
144 -
 145
145 -
 146
146 -
147
-
148
-
149
-
150
-
151
-
152
-
153
-
154
-
155
-
156
-
157
-
158
-
159
-
160
-
161
-
162
-
163
 |
 |
