Konica Minolta bizhub PRESS C6000 bizhub PRESS C6000/C7000 IC-601 Network Scan - Page 61
Using the Network Scanner Features
 |
View all Konica Minolta bizhub PRESS C6000 manuals
Add to My Manuals
Save this manual to your list of manuals |
Page 61 highlights
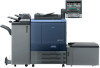
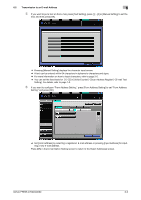
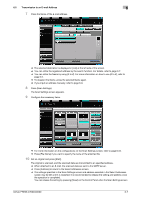
6.1 Keys on the Select Addresses Screen 6 6 Using the Network Scanner Features 6.1 Keys on the Select Addresses Screen In order to run scanning, you need to specify an address/storage location to which you send the scanned data. The following pages describe the common keys on the Select Addresses screen. d Reference On how to display the Select Addresses screen, refer to step 1 and 2 for each of the followings. Transmission to an E-mail Address (p. 6-4) Storing in the Hard Disk (p. 6-10) Transmission to the FTP Server (p. 6-14) Transmission to the SMB server (p. 6-20) Transmission to a Group (p. 6-30) Transmission Using Web Service (WS Scan) (p. 6-32) [A to Z] [Others] [Main] / [Search] [Input Address] [Clear All] [Register/Edit] bizhub PRESS C7000/C6000 When this key is pressed, it displays the register name corresponding to the selected [A to Z] key. When this key is pressed, it displays the register name of which capital letter is a sign. It also displays the register name having no reference name. When this key is pressed, it displays only the register name that has been set as the Main address. An administrator of the copier configures the Main address. For more information, contact your administrator of the copier. Pressing these keys switch between Name pages. Continue pressing the keys to switch pages consecutively. The Input Character for Search screen appears. When search results are displayed, this key is highlighted in reverse image. For more information on how to search, refer to page 3-7. The Manual Address Input screen appears. Pressing this key deselects all the selected addresses. Displays [Add], [Change], and [Delete] keys. 6-2
-
 1
1 -
2
-
3
-
4
-
5
-
6
-
7
-
8
-
9
-
10
-
11
-
12
-
13
-
14
-
15
-
16
-
17
-
18
-
19
-
20
-
21
-
22
-
23
-
24
-
25
-
26
-
27
-
28
-
29
-
30
-
31
-
32
-
33
-
34
-
35
-
36
-
37
-
38
-
39
-
40
-
41
-
42
-
43
-
44
-
45
-
46
-
47
-
48
-
49
-
50
-
51
-
52
-
53
-
54
-
55
-
 56
56 -
 57
57 -
 58
58 -
 59
59 -
 60
60 -
 61
61 -
 62
62 -
 63
63 -
 64
64 -
 65
65 -
 66
66 -
67
-
68
-
69
-
70
-
71
-
72
-
73
-
74
-
75
-
76
-
77
-
78
-
79
-
80
-
81
-
82
-
83
-
84
-
85
-
86
-
87
-
88
-
89
-
90
-
91
-
92
-
93
-
94
-
95
-
96
-
97
-
98
-
99
-
100
-
101
-
102
-
103
-
104
-
105
-
106
-
107
-
108
-
109
-
110
-
111
-
112
-
113
-
114
-
115
-
116
-
117
-
118
-
119
 |
 |
