Kyocera FS-C5300DN FS-C5100DN/C5200DN/C5300DN KX Driver User Guide Ver. 7.7 - Page 70
Selecting and Creating Custom Colors, Edit Watermark, Add to Custom Colors
 |
UPC - 632983010303
View all Kyocera FS-C5300DN manuals
Add to My Manuals
Save this manual to your list of manuals |
Page 70 highlights
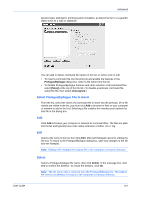
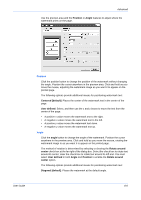
Advanced 8-7 User defined: Select to change the angle from the default value. Type the number for the angle you want. An angle is measured in degrees, ranging from 0 to 360. Selecting and Creating Custom Colors 1 To use a predefined color for the watermark text, select one from the Color list. 1 2 For more colors, select Custom at the bottom of the list. Click the button to open the Color dialog box. 2 3 Click one of the Basic colors and click OK, or click Define Custom Colors to open the color spectrum panel. 3 4 In the color spectrum, click and drag the pointer to different areas of the spectrum to adjust the hue and saturation levels. The corresponding numeric values appear in the Hue, Sat, and RGB (Red, Green, Blue) text boxes. Click and drag the slider at the right side of the color spectrum to adjust the luminosity (relative lightness or darkness) of a color. The corresponding numeric value appears in the Lum and RGB text boxes. 4 5 You can also create a specific color by typing numbers in the Hue, Sat, Lum or RGB text boxes. 5 6 Click Add to Custom Colors to save the new color to the Custom colors at the bottom left of the Color dialog box. 6 7 Click OK to save any new custom colors and close the Color dialog box. To close the dialog box without saving any new colors, click Cancel. 7 Edit Watermark The Edit Watermark feature lets you select an existing watermark and make changes to its appearance and properties. For standard watermarks, the Watermark name and Watermark text cannot be changed. 1 From the Select watermark list, select a watermark to edit. 8 2 Click Edit to open the Edit Watermark dialog box. 9 3 Make any adjustments you want to the watermark. For more information about changing watermark properties, see Add Watermark on page 8-5. 10 4 When you are finished editing, click OK to save any changes you made to the watermark. To exit the dialog box without saving the changes, click Cancel. 11 Delete Watermark The Delete feature lets you delete custom watermarks that were added. The standard watermarks cannot be deleted. 1 From the Select watermark list, select a watermark to delete. 12 2 Click Delete. 13 3 In the message box, click Yes to confirm the deletion. To refuse the deletion, click No. 14 KX Driver
-
 1
1 -
2
-
3
-
4
-
5
-
6
-
7
-
8
-
9
-
10
-
11
-
12
-
13
-
14
-
15
-
16
-
17
-
18
-
19
-
20
-
21
-
22
-
23
-
24
-
25
-
26
-
27
-
28
-
29
-
30
-
31
-
32
-
33
-
34
-
35
-
36
-
37
-
38
-
39
-
40
-
41
-
42
-
43
-
44
-
45
-
46
-
47
-
48
-
49
-
50
-
51
-
52
-
53
-
54
-
55
-
56
-
57
-
58
-
59
-
60
-
61
-
62
-
63
-
64
-
 65
65 -
 66
66 -
 67
67 -
 68
68 -
 69
69 -
 70
70 -
 71
71 -
 72
72 -
 73
73 -
 74
74 -
 75
75 -
76
-
77
-
78
-
79
-
80
-
81
-
82
-
83
-
84
 |
 |
