Kyocera TASKalfa 180 180/220 Operation Guide Rev-2 - Page 28
Message Display - error codes
 |
View all Kyocera TASKalfa 180 manuals
Add to My Manuals
Save this manual to your list of manuals |
Page 28 highlights
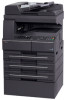
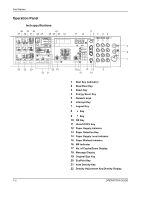
Part Names Message Display The message display on the operation panel shows: • Status information, the messages listed below which are displayed during normal operation. • Error codes, when the printer requires the operator's attention, refer to Responding to Error Messages on page 8-5. Status Information Message Self test Please wait. Ready to copy. Meaning The copier is performing self-diagnostics after power-up. The copier is warming up and is not ready. When the copier is switched on for the first time, this message will take approximately 20 seconds. The copier is ready to copy. Error codes Refer to Responding to Error Messages on page 8-5. System Menu (the mode after warm-up processing has been completed or Reset key was pressed) The copier has been set at the factory to automatically select a magnification ratio of 1:1 for the same size of paper as the original in the Auto Mode with the No. of Copies at "1" and for the Image Quality. NOTE: The Default Settings can be changed in the System Menu. In the case where an optional cassette is present, the cassette selected in the System Menu can be changed. (Refer to Selected Cassette on page 5-14.) The Image Quality Mode selected in the System Menu can be changed. (Refer to Original Image Quality on page 5-9.) The Default Setting for the copy density can be changed to the Auto. (Refer to Initial Density on page 5-10.) Auto Clear function After the copy has been produced and a fixed interval (10 to 270 seconds) has elapsed, the copier will automatically revert to the state it was in when warm-up processing was completed.(However, the copy density mode and the Image Quality will not revert back to their original state. Copies can still be repeatedly produced with the same Copy Mode, No. of Copies, copy density and other settings if the Auto clear function has not been activated. NOTE: Please refer to Auto Clear Time on page 5-21. Please refer to Auto Clear Setting on page 5-20 for information on changing the time interval before the Auto clear function activates. 1-4 OPERATION GUIDE
-
 1
1 -
2
-
3
-
4
-
5
-
6
-
7
-
8
-
9
-
10
-
11
-
12
-
13
-
14
-
15
-
16
-
17
-
18
-
19
-
20
-
21
-
22
-
 23
23 -
 24
24 -
 25
25 -
 26
26 -
 27
27 -
 28
28 -
 29
29 -
 30
30 -
 31
31 -
 32
32 -
 33
33 -
34
-
35
-
36
-
37
-
38
-
39
-
40
-
41
-
42
-
43
-
44
-
45
-
46
-
47
-
48
-
49
-
50
-
51
-
52
-
53
-
54
-
55
-
56
-
57
-
58
-
59
-
60
-
61
-
62
-
63
-
64
-
65
-
66
-
67
-
68
-
69
-
70
-
71
-
72
-
73
-
74
-
75
-
76
-
77
-
78
-
79
-
80
-
81
-
82
-
83
-
84
-
85
-
86
-
87
-
88
-
89
-
90
-
91
-
92
-
93
-
94
-
95
-
96
-
97
-
98
-
99
-
100
-
101
-
102
-
103
-
104
-
105
-
106
-
107
-
108
-
109
-
110
-
111
-
112
-
113
-
114
-
115
-
116
-
117
-
118
-
119
-
120
-
121
-
122
-
123
-
124
-
125
-
126
-
127
-
128
-
129
-
130
-
131
-
132
-
133
-
134
-
135
-
136
-
137
-
138
-
139
-
140
-
141
-
142
-
143
-
144
-
145
-
146
-
147
-
148
-
149
-
150
-
151
-
152
-
153
-
154
-
155
-
156
-
157
-
158
-
159
-
160
-
161
-
162
-
163
-
164
 |
 |
