Kyocera TASKalfa 4551ci Fax System (W) Operation Guide Rev-2.2013.1 - Page 65
Changing Registration
 |
View all Kyocera TASKalfa 4551ci manuals
Add to My Manuals
Save this manual to your list of manuals |
Page 65 highlights
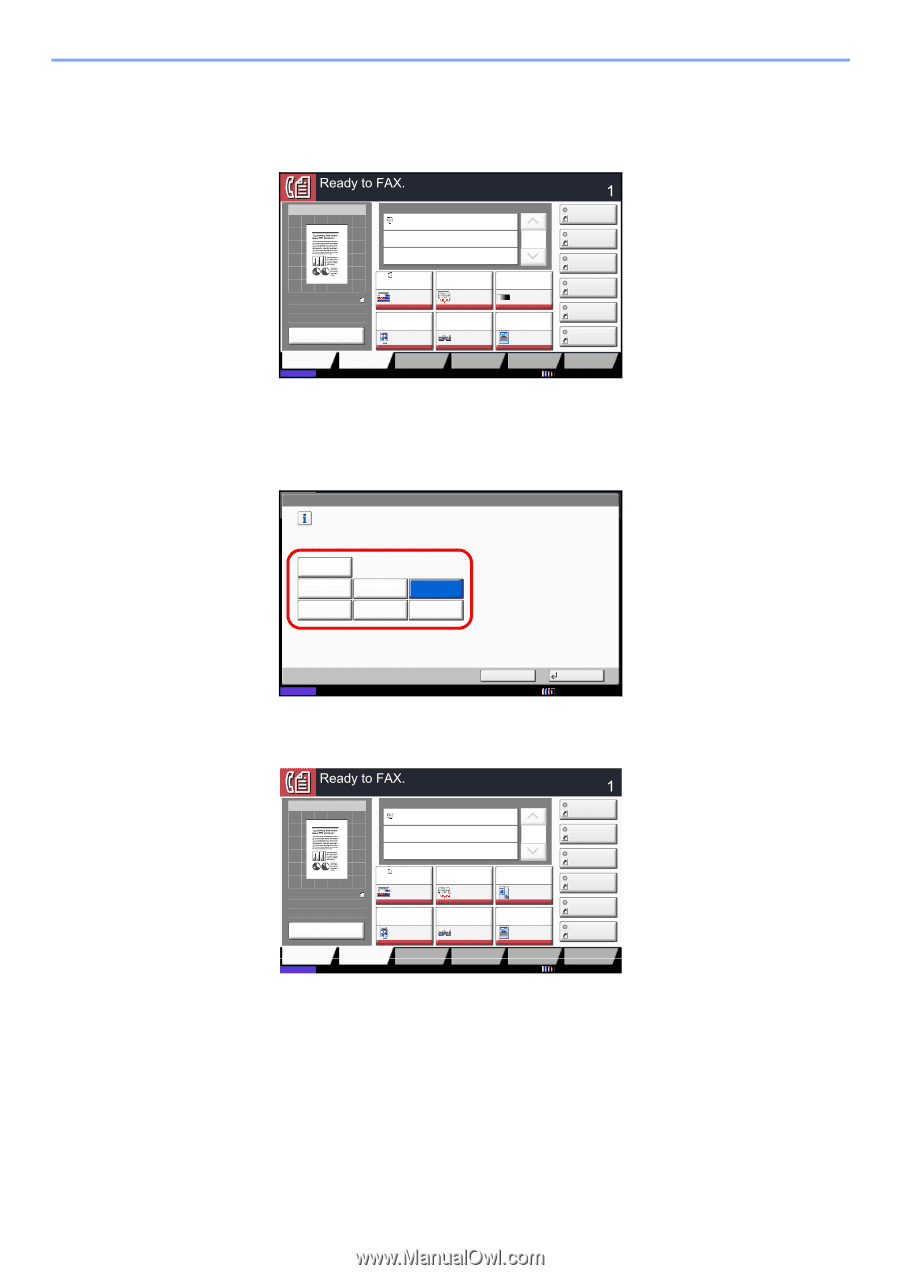
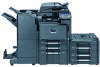
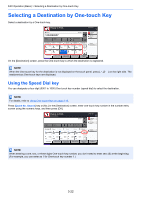
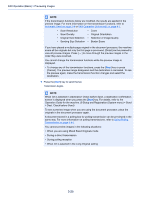
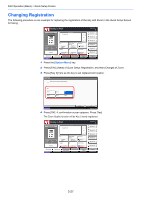
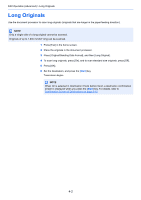
FAX Operation (Basic) > Quick Setup Screen Changing Registration The following procedure is one example for replacing the registration of Density with Zoom in the Quick Setup Screen for faxing. Destination Sending Image Destination 0123456789 1/1 Original : A4 Zoom : 100% Send : A4 A4 Original Size 1-sided 200x100dpi Normal FAX TX Resolution Off Normal 0 Density Text+Photo Preview Destination Status 2-sided/Book Original Quick Setup Org./Sending Data Format Continuous Scan Image Quality Original Image Advanced Setup 1 Press the [System Menu] key. Shortcut 1 Shortcut 2 Shortcut 3 Shortcut 4 Shortcut 5 Shortcut 6 Program 02/02/2013 10:10 2 Press [FAX], [Next] of Quick Setup Registration, and then [Change] of Zoom. 3 Press [Key 3] here as the key to set replacement location. FAX - Zoom Add Zoom to the Quick Setup screen. Off Key 1 Key 4 Key 2 Key 5 Key 3 Key 6 Status Cancel OK 02/02/2013 10:10 4 Press [OK]. A confirmation screen appears. Press [Yes]. The Zoom Quality function will be Key 3 newly registered. Destination Sending Image Destination 0123456789 1/1 Original : A4 Zoom : 100% Send : A4 A4 Original Size 1-sided 200x100dpi Normal FAX TX Resolution Off Normal 0 Zoom Text+Photo Preview Destination Status 2-sided/Book Original Quick Setup Org./Sending Data Format Continuous Scan Image Quality Original Image Advanced Setup Shortcut 1 Shortcut 2 Shortcut 3 Shortcut 4 Shortcut 5 Shortcut 6 Program 02/02/2013 10:10 3-27
-
 1
1 -
2
-
3
-
4
-
5
-
6
-
7
-
8
-
9
-
10
-
11
-
12
-
13
-
14
-
15
-
16
-
17
-
18
-
19
-
20
-
21
-
22
-
23
-
24
-
25
-
26
-
27
-
28
-
29
-
30
-
31
-
32
-
33
-
34
-
35
-
36
-
37
-
38
-
39
-
40
-
41
-
42
-
43
-
44
-
45
-
46
-
47
-
48
-
49
-
50
-
51
-
52
-
53
-
54
-
55
-
56
-
57
-
58
-
59
-
 60
60 -
 61
61 -
 62
62 -
 63
63 -
 64
64 -
 65
65 -
 66
66 -
 67
67 -
 68
68 -
 69
69 -
 70
70 -
71
-
72
-
73
-
74
-
75
-
76
-
77
-
78
-
79
-
80
-
81
-
82
-
83
-
84
-
85
-
86
-
87
-
88
-
89
-
90
-
91
-
92
-
93
-
94
-
95
-
96
-
97
-
98
-
99
-
100
-
101
-
102
-
103
-
104
-
105
-
106
-
107
-
108
-
109
-
110
-
111
-
112
-
113
-
114
-
115
-
116
-
117
-
118
-
119
-
120
-
121
-
122
-
123
-
124
-
125
-
126
-
127
-
128
-
129
-
130
-
131
-
132
-
133
-
134
-
135
-
136
-
137
-
138
-
139
-
140
-
141
-
142
-
143
-
144
-
145
-
146
-
147
-
148
-
149
-
150
-
151
-
152
-
153
-
154
-
155
-
156
-
157
-
158
-
159
-
160
-
161
-
162
-
163
-
164
-
165
-
166
-
167
-
168
-
169
-
170
-
171
-
172
-
173
-
174
-
175
-
176
-
177
-
178
-
179
-
180
-
181
-
182
-
183
-
184
-
185
-
186
-
187
-
188
-
189
-
190
-
191
-
192
-
193
-
194
-
195
-
196
-
197
-
198
-
199
-
200
-
201
-
202
-
203
-
204
-
205
-
206
-
207
-
208
-
209
-
210
-
211
-
212
-
213
-
214
-
215
-
216
-
217
-
218
-
219
-
220
-
221
-
222
-
223
-
224
-
225
-
226
-
227
-
228
-
229
-
230
-
231
-
232
-
233
-
234
-
235
-
236
-
237
-
238
-
239
-
240
-
241
-
242
-
243
-
244
-
245
-
246
-
247
-
248
-
249
-
250
-
251
-
252
-
253
-
254
-
255
-
256
-
257
-
258
-
259
-
260
-
261
-
262
 |
 |