Kyocera TASKalfa 520i 420i/520i Operation Guide - Page 377
Counting the Number of s Printed, Total Job Accounting/Resetting the Counter, Detail
 |
View all Kyocera TASKalfa 520i manuals
Add to My Manuals
Save this manual to your list of manuals |
Page 377 highlights
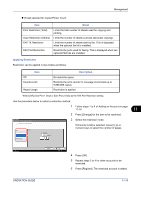
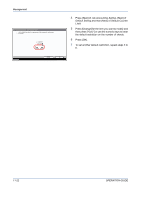
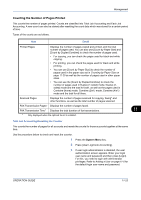
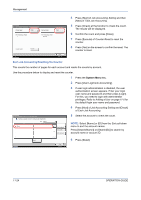
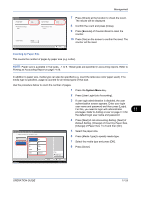
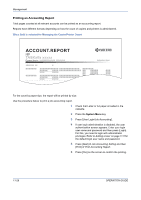
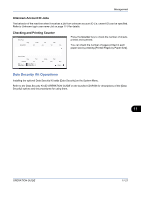
Management Counting the Number of Pages Printed This counts the number of pages printed. Counts are classified into Total Job Accounting and Each Job Accounting. A new count can also be started after resetting the count data which was stored for a certain period of time. Types of the counts are as follows. Item Detail Printed Pages Displays the number of pages copied and printed, and the total number of pages used. You can also use [Count by Paper Size] and [Count by Duplex/Combine] to check the number of pages used. • For copying, you can check the pages used for black and white copying. • For printing, you can check the pages used for black and white printing. • You can use [Count by Paper Size] to check the number of pages used in the paper size set in Counting by Paper Size on page 11-25 as well as the number of pages used in other paper sizes. • You can use the [Count by Duplex/Combine] to check the number of pages used in Duplex (1-sided) mode, Duplex (2sided) mode and the total for both, as well as the pages used in Combine (None) mode, Combine (2in1) mode, Combine (4in1) mode and the total for all three. Scanned Pages Displays the number of pages scanned for copying, faxing* and other functions, as well as the total number of pages scanned. FAX Transmission Pages* Displays the number of pages faxed. FAX Transmission Time* Displays the total duration of fax transmissions. 11 * Only displayed when the optional fax kit is installed. Total Job Accounting/Resetting the Counter This counts the number of pages for all accounts and resets the counts for those accounts together at the same time. Use the procedure below to check and reset the counter. 1 Press the System Menu key. 2 Press [User Login/Job Accounting]. 3 If user login administration is disabled, the user authentication screen appears. Enter your login user name and password and then press [Login]. For this, you need to login with administrator privileges. Refer to Adding a User on page 11-5 for the default login user name and password. OPERATION GUIDE 11-23
-
 1
1 -
2
-
3
-
4
-
5
-
6
-
7
-
8
-
9
-
10
-
11
-
12
-
13
-
14
-
15
-
16
-
17
-
18
-
19
-
20
-
21
-
22
-
23
-
24
-
25
-
26
-
27
-
28
-
29
-
30
-
31
-
32
-
33
-
34
-
35
-
36
-
37
-
38
-
39
-
40
-
41
-
42
-
43
-
44
-
45
-
46
-
47
-
48
-
49
-
50
-
51
-
52
-
53
-
54
-
55
-
56
-
57
-
58
-
59
-
60
-
61
-
62
-
63
-
64
-
65
-
66
-
67
-
68
-
69
-
70
-
71
-
72
-
73
-
74
-
75
-
76
-
77
-
78
-
79
-
80
-
81
-
82
-
83
-
84
-
85
-
86
-
87
-
88
-
89
-
90
-
91
-
92
-
93
-
94
-
95
-
96
-
97
-
98
-
99
-
100
-
101
-
102
-
103
-
104
-
105
-
106
-
107
-
108
-
109
-
110
-
111
-
112
-
113
-
114
-
115
-
116
-
117
-
118
-
119
-
120
-
121
-
122
-
123
-
124
-
125
-
126
-
127
-
128
-
129
-
130
-
131
-
132
-
133
-
134
-
135
-
136
-
137
-
138
-
139
-
140
-
141
-
142
-
143
-
144
-
145
-
146
-
147
-
148
-
149
-
150
-
151
-
152
-
153
-
154
-
155
-
156
-
157
-
158
-
159
-
160
-
161
-
162
-
163
-
164
-
165
-
166
-
167
-
168
-
169
-
170
-
171
-
172
-
173
-
174
-
175
-
176
-
177
-
178
-
179
-
180
-
181
-
182
-
183
-
184
-
185
-
186
-
187
-
188
-
189
-
190
-
191
-
192
-
193
-
194
-
195
-
196
-
197
-
198
-
199
-
200
-
201
-
202
-
203
-
204
-
205
-
206
-
207
-
208
-
209
-
210
-
211
-
212
-
213
-
214
-
215
-
216
-
217
-
218
-
219
-
220
-
221
-
222
-
223
-
224
-
225
-
226
-
227
-
228
-
229
-
230
-
231
-
232
-
233
-
234
-
235
-
236
-
237
-
238
-
239
-
240
-
241
-
242
-
243
-
244
-
245
-
246
-
247
-
248
-
249
-
250
-
251
-
252
-
253
-
254
-
255
-
256
-
257
-
258
-
259
-
260
-
261
-
262
-
263
-
264
-
265
-
266
-
267
-
268
-
269
-
270
-
271
-
272
-
273
-
274
-
275
-
276
-
277
-
278
-
279
-
280
-
281
-
282
-
283
-
284
-
285
-
286
-
287
-
288
-
289
-
290
-
291
-
292
-
293
-
294
-
295
-
296
-
297
-
298
-
299
-
300
-
301
-
302
-
303
-
304
-
305
-
306
-
307
-
308
-
309
-
310
-
311
-
312
-
313
-
314
-
315
-
316
-
317
-
318
-
319
-
320
-
321
-
322
-
323
-
324
-
325
-
326
-
327
-
328
-
329
-
330
-
331
-
332
-
333
-
334
-
335
-
336
-
337
-
338
-
339
-
340
-
341
-
342
-
343
-
344
-
345
-
346
-
347
-
348
-
349
-
350
-
351
-
352
-
353
-
354
-
355
-
356
-
357
-
358
-
359
-
360
-
361
-
362
-
363
-
364
-
365
-
366
-
367
-
368
-
369
-
370
-
371
-
 372
372 -
 373
373 -
 374
374 -
 375
375 -
 376
376 -
 377
377 -
 378
378 -
 379
379 -
 380
380 -
 381
381 -
 382
382 -
383
-
384
-
385
-
386
-
387
-
388
-
389
-
390
-
391
-
392
-
393
-
394
-
395
-
396
-
397
-
398
-
399
-
400
-
401
-
402
-
403
-
404
-
405
-
406
-
407
-
408
-
409
-
410
-
411
-
412
-
413
-
414
-
415
-
416
-
417
-
418
-
419
-
420
-
421
-
422
-
423
-
424
-
425
-
426
-
427
-
428
 |
 |
