LG 70UL3E Owners Manual - Page 5
Preparing, Optional Extras, Stand, Wall Mounting Bracket - t warranty
 |
View all LG 70UL3E manuals
Add to My Manuals
Save this manual to your list of manuals |
Page 5 highlights
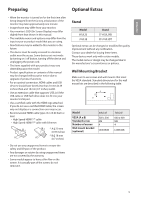
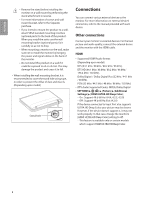
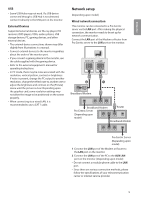
ENGLISH Preparing Optional Extras •• When the monitor is turned on for the first time after being shipped from the factory, initialization of the monitor may take approximately one minute. •• Image shown may differ from your monitor. •• Your monitor's OSD (On Screen Display) may differ slightly from that shown in this manual. •• The available menus and options may differ from the input source or product model that you are using. •• New features may be added to this monitor in the future. •• The device must be easily accessed to a location outlet near the access. Some devices are not made by turning on / off button, turning off the device and unplugging the power cord. •• The items supplied with your product may vary depending upon the model. •• Product specifications or contents of this manual may be changed without prior notice due to upgrade of product functions. •• For an optimal connection, HDMI cables and USB devices should have bezels less than 10 mm (0.39 inches) thick and 18 mm (0.7 inches) width. •• Use an extension cable that supports USB 2.0 if the USB cable or USB flash drive does not fit into your monitor's USB port. •• Use a certified cable with the HDMI logo attached. If you do not use a certified HDMI cable, the screen may not display or a connection error may occur. •• Recommended HDMI cable types (3 m (9.84 feet) or less) • High Speed HDMI®/™ cable • High Speed HDMI®/™ cable with Ethernet B A B A * A 10 mm (0.39 inches) * B 18 mm (0.7 inches) •• Do not use any unapproved items to ensure the safety and lifespan of the product. •• Any damages or injuries by using unapproved items are not covered by the warranty. •• Some models appear to have a thin film on the screen. It is actually part of the screen; do not remove it. Stand Model 60UL3E 70UL3E Stand ST-60UL3RB ST-70UL3DT Optional extras can be changed or modified for quality improvement without any notification. Contact your dealer for buying these items. These devices work only with certain models. The model name or design may be changed due to the manufacturer's circumstances or policies. Wall Mounting Bracket Make sure to use screws and wall mounts that meet the VESA standard. Standard dimensions for the wall mount kits are described in the following table. A B Model VESA (A x B) Standard screw Number of screws Wall mount bracket (optional) 60UL3E 300 x 300 M6 4 OLW480B 70UL3E 600 x 400 M8 4 LSW640B 5
-
 1
1 -
 2
2 -
 3
3 -
 4
4 -
 5
5 -
 6
6 -
 7
7 -
 8
8 -
 9
9 -
 10
10 -
 11
11 -
12
-
13
-
14
-
15
-
16
-
17
-
18
-
19
-
20
-
21
-
22
-
23
-
24
-
25
-
26
-
27
-
28
-
29
-
30
-
31
-
32
-
33
-
34
-
35
-
36
-
37
-
38
-
39
-
40
-
41
-
42
-
43
-
44
-
45
-
46
-
47
-
48
-
49
-
50
-
51
-
52
-
53
-
54
-
55
-
56
-
57
-
58
-
59
-
60
-
61
-
62
-
63
-
64
-
65
-
66
-
67
-
68
-
69
-
70
-
71
-
72
-
73
-
74
-
75
-
76
-
77
-
78
-
79
-
80
-
81
-
82
-
83
-
84
-
85
-
86
-
87
-
88
-
89
-
90
-
91
-
92
-
93
-
94
-
95
-
96
-
97
-
98
-
99
-
100
-
101
-
102
-
103
-
104
-
105
-
106
-
107
-
108
-
109
-
110
-
111
-
112
-
113
-
114
-
115
-
116
-
117
-
118
-
119
-
120
-
121
-
122
-
123
-
124
-
125
 |
 |
