LG ARUN096BT2 Installation Manual - Page 66
The Procedure of Automatic Addressing
 |
View all LG ARUN096BT2 manuals
Add to My Manuals
Save this manual to your list of manuals |
Page 66 highlights
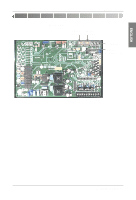
Electrical Wiring Automatic Addressing • The address of indoor units would be set by auto addressing 1) Wait for 3 minutes after applying power supply (main and sub outdoor unit, indoor unit). 2) Press the switch of the outdoor unit (SW02V) for 5 seconds. 3) A "88" is indicated on 7-segment LED of the outdoor unit PCB. 4) For completing addressing, 2~7 minutes are required depending on numbers of indoor unit connection set. 5) Numbers of indoor unit connection set whose addressing is completed are indicated for 30seconds on 7-segment LED of the outdoor unit PCB. 6) After completing addressing, address of each indoor unit is indicated on the wired remote control display window. (CH01, CH02, CH03 CH06: Indicated as numbers of indoor unit connection set.) SW01B SW02B (DIP S/W) (DIP S/W) 7 - Segment SW02V Auto addressing CAUTION - In replacement of the indoor unit PCB, always perform auto address setting again. If power supply is not applied to the indoor unit, operation error occurs. Auto addressing is only possible on the main PCB Auto addressing has to be performed after 3 minutes to improve communication. x The Procedure of Automatic Addressing Power On Waiting 3 minutes Press SW02V for 5 sec. 7-segment LED = 88 Auto addressing start Don't Press SW02V Waiting about 2~7 minutes • Auto addressing setting end Numbers of indoor unit connection set whose addressing is completed are indicated for 30seconds on 7-segment LED after completing setting 7-segment LED = 88 YES OK NO Check the connections of communication line Indoor address number is displayed on wired remote control or indoor unit display window. It is not an error message, will disappeared when on/off button is pressed on remote control ex) Display of 01, 02, ..., 15 means connection of 15 indoor units and auto addressing is completed normally. 66 Outdoor Unit
-
 1
1 -
2
-
3
-
4
-
5
-
6
-
7
-
8
-
9
-
10
-
11
-
12
-
13
-
14
-
15
-
16
-
17
-
18
-
19
-
20
-
21
-
22
-
23
-
24
-
25
-
26
-
27
-
28
-
29
-
30
-
31
-
32
-
33
-
34
-
35
-
36
-
37
-
38
-
39
-
40
-
41
-
42
-
43
-
44
-
45
-
46
-
47
-
48
-
49
-
50
-
51
-
52
-
53
-
54
-
55
-
56
-
57
-
58
-
59
-
60
-
 61
61 -
 62
62 -
 63
63 -
 64
64 -
 65
65 -
 66
66 -
 67
67 -
 68
68 -
 69
69 -
 70
70 -
 71
71 -
72
-
73
-
74
-
75
-
76
-
77
-
78
-
79
-
80
-
81
-
82
-
83
-
84
-
85
-
86
-
87
-
88
-
89
-
90
-
91
 |
 |
