LG LRY-517 Owners Manual - Page 39
About JPEG image files
 |
View all LG LRY-517 manuals
Add to My Manuals
Save this manual to your list of manuals |
Page 39 highlights
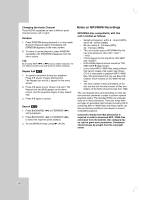
View Slide Shows 1. Select [Slide Show] option on the Photo menu. 2. Press ENTER. 3. Use b / B / v / V to set the options. [Object] option: • [Selected] Views slide show only selected files. • [All] Views slide show all files. [Speed] option: Sets the Slide Show speed to [Normal], [Slow], or [Fast]. 4. Select the [Start] option then press ENTER to start the Slide Show. 5. Press STOP (x) to stop the Slide Show and returns to the Photo menu. Tips: • Use the CLEAR button to select all files, or cancel all marked files. • Selecting multiple files 1. Press MARKER. A check mark appears on the file. Press MARKER again to cancel the marked file. 2. Repeat step 1 to mark additional file. About JPEG image files JPEG disc compatibility with this recorder is limited as follows: • Depending upon the size and number of JPEG files, it could take a long time for the recorder to read the files. If you don't see an on-screen display after several minutes, some of the files may be too large - reduce the resolution of the JPEG files to less than 4M pixels. • The total number of files and folders on the disc are free but the total number of files and folders on the folder should be less than 1999. • Some discs may be incompatible due to a different recording format or the condition of disc. • Ensure that all the selected files have the ".jpg" extensions when copying into the CD layout. • If the files have ".jpe" or ".jpeg" extensions, please rename them as ".jpg" file. • File names without ".jpg" extension will not be able to be read by this recorder. Even though the files are shown as JPEG image files in Windows Explorer. • Progressive and lossless compression JPEG image files are not supported. Playback 39
-
 1
1 -
2
-
3
-
4
-
5
-
6
-
7
-
8
-
9
-
10
-
11
-
12
-
13
-
14
-
15
-
16
-
17
-
18
-
19
-
20
-
21
-
22
-
23
-
24
-
25
-
26
-
27
-
28
-
29
-
30
-
31
-
32
-
33
-
 34
34 -
 35
35 -
 36
36 -
 37
37 -
 38
38 -
 39
39 -
 40
40 -
 41
41 -
 42
42 -
 43
43 -
 44
44 -
45
-
46
-
47
-
48
-
49
-
50
-
51
-
52
-
53
-
54
-
55
-
56
-
57
-
58
-
59
-
60
-
61
-
62
 |
 |
