LG MHEC1737F INSTALLATION - Page 11
Step 4: Prepare the Wall and Upper, Cabinet
 |
View all LG MHEC1737F manuals
Add to My Manuals
Save this manual to your list of manuals |
Page 11 highlights
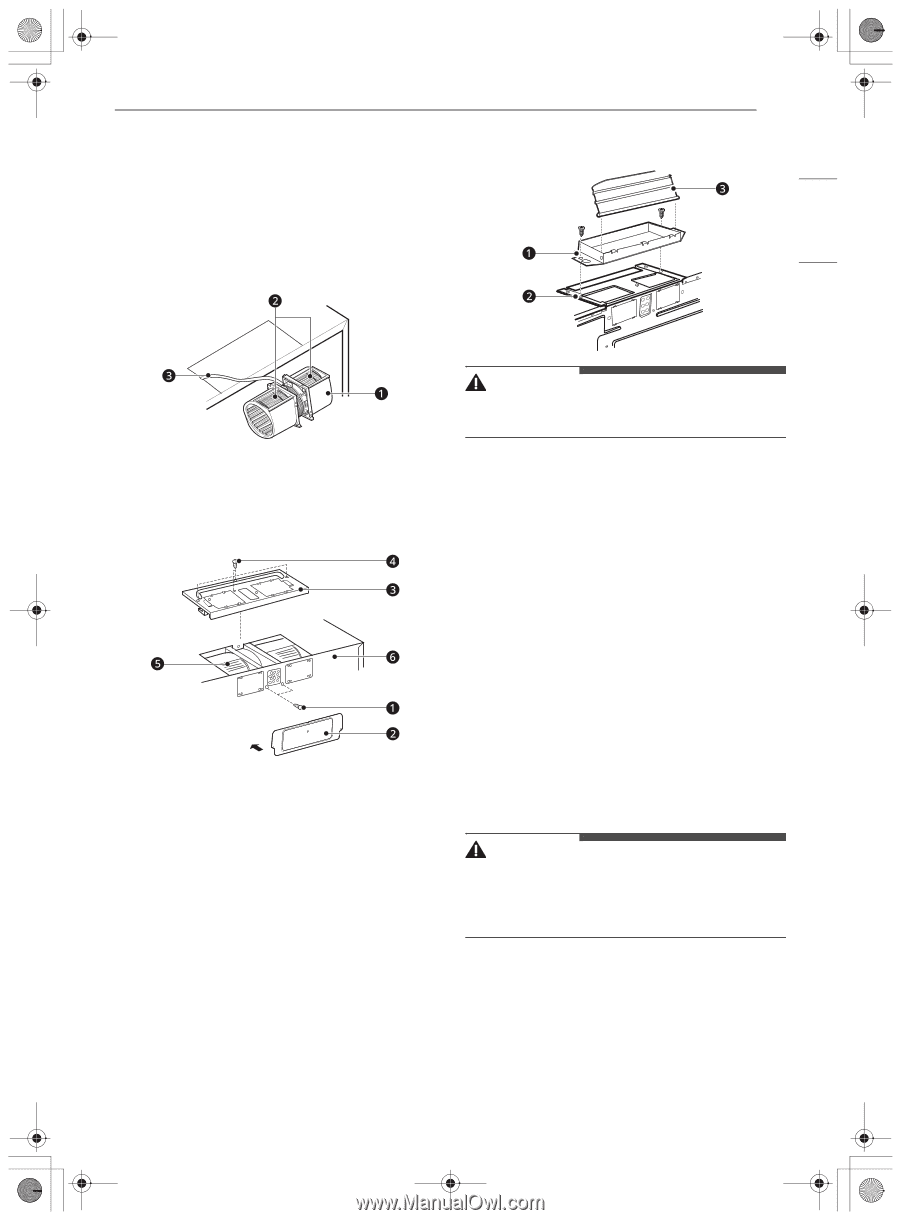
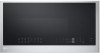
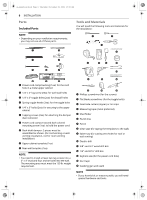
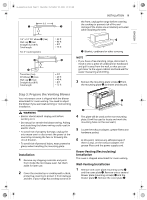
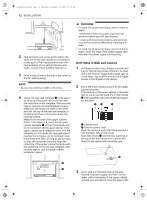
us_main.book.book Page 11 Thursday, November 25, 2021 10:15 AM Roof-Venting Installation 1 Follow steps 1 and 2 under Wall-Venting Installation. 2 Rotate and reinstall the blower unit a so that the exhaust ports b face the top of the cabinet. When you insert the blower unit, the blower wire c must be routed as shown. INSTALLATION 11 provided. Make sure that the damper c swings freely. ENGLISH 3 Attach one or two blower unit mounting screw(s) a. Attach the cover plate b on the back. Attach the blower plate c to the microwave oven. Attach one or several blower plate mounting screw(s) d. e Blower unit f Back plate 4 Insert the tabs on each side of the damper into the holes at the inside rear of the adapter. Attach the exhaust adapter a to the blower plate b with the two tapping screws WARNING • Fire hazard! Correctly install the vent fan before use. When changing the vent fan position for wall venting or roof venting: • Properly align the ventilation fan openings and blower plate knockouts. • Ventilation fan openings should be completely exposed to the outside. • After installation, check the air ventilation path. Refer to step 2 for proper vent selection. Improper installation can cause problems such as: • Inability to assemble the blower plate or ventilation motor correctly • Abnormal noise during product operation • Weak ventilation • Product overheating and the possibility of product breakdown or fire Step 4: Prepare the Wall and Upper Cabinet WARNING • To avoid personal injury or property damage, do not attempt to install this microwave oven if you cannot find a wall stud. Consult a carpenter or contractor. Measure and Attach Templates 1 Using a plumb line and (metal) measuring tape, find and mark the vertical center line on the back wall of the opening.
-
 1
1 -
2
-
3
-
4
-
5
-
 6
6 -
 7
7 -
 8
8 -
 9
9 -
 10
10 -
 11
11 -
 12
12 -
 13
13 -
 14
14 -
 15
15 -
 16
16
 |
 |