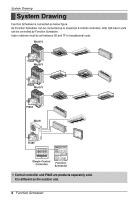
LG PQCSD130A0 Owner's Manual - Page 8
remote controller to the installation
 |
View all LG PQCSD130A0 manuals
Add to My Manuals
Save this manual to your list of manuals |
Page 8 highlights
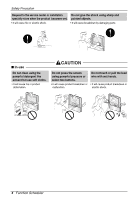
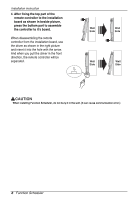
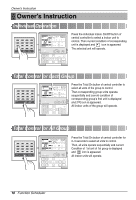
Installation instruction 4. After fixing the top part of the remote controller to the installation board as shown in beside picture, press the bottom part to assemble the controller to it's board. When disassembling the remote controller from the installation board, use the driver as shown in the right picture and insert it into the hole with the arrow. And when you pull the driver in the front direction, the remote controller will be separated. Wall Side Wall Side Wall Side Wall Side CAUTION When installing Function Scheduler, do not bury it in the wall. (It can cause communication error.) 8 Function Scheduler
-
 1
1 -
2
-
 3
3 -
 4
4 -
 5
5 -
 6
6 -
 7
7 -
 8
8 -
 9
9 -
 10
10 -
 11
11 -
 12
12 -
 13
13 -
14
-
15
-
16
-
17
-
18
-
19
-
20
-
21
-
22
-
23
-
24
-
25
-
26
-
27
-
28
-
29
-
30
-
31
-
32
-
33
-
34
-
35
-
36
 |
 |

8
Function Scheduler
Installation instruction
Wall
Side
Wall
Side
Wall
Side
Wall
Side
4. After fixing the top part of the
remote controller to the installation
board as shown in beside picture,
press the bottom part to assemble
the controller to it
’
s board.
When disassembling the remote
controller from the installation board, use
the driver as shown in the right picture
and insert it into the hole with the arrow.
And when you pull the driver in the front
direction, the remote controller will be
separated.
When installing Function Scheduler, do not bury it in the wall. (It can cause communication error.)
CAUTION