LG TD-V10021G User Guide - Page 40
Stacking Kit Installation
 |
View all LG TD-V10021G manuals
Add to My Manuals
Save this manual to your list of manuals |
Page 40 highlights
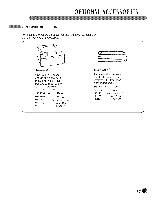
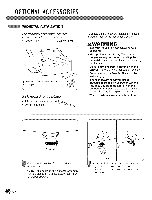
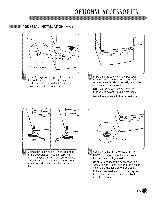
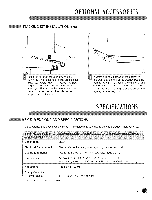
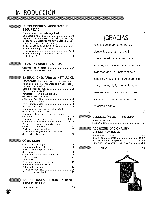
OPTIONAl_ACCESSO IES STACKING KIT INSTALLATION This stacking kit includes: • Two (2) side rails • One (1) front rail • Four (4) screws TOOLSNeeded for Installation: • Phillips-head screwdriver To ensure safe and secure installation, please observe the following instructions. WARN|NG • incorrect installation can cause serious accidents. = The weight of the dryer and the height of installation make this stacking procedure too risky for one person. Two or more people are required when installing the stacking kit. There is a risk of serious back injury or other injuries. • Do not use the stacking kit with a gas dryer in potentially unstable conditions such as a mobile home. Failure to follow this warning can result in serious injury. Place the washer on a solid, stable, level floor capable of supporting the weight of both appliances. Failure to follow this warning can result in serious injury. Do NOT stack the washer on top of the dryer. Failure to follow this warning can result in serious injury. • if appliances are already installed, disconnect them from all power, water, or gas lines and from draining or venting connections. Failure to do so can result in electrical shock, fire, explosion, or death. Make sure the surface of the washer is clean and dry. Remove paper backing from the tape on one of the stacking kit side brackets. 40 Fit the side bracket to the side of the washer top as shown in the above illustration. Firmly press the adhesive area of the bracket to the washer surface. Secure the side bracket to the washer with a screw on the back side of the bracket. Repeat steps 1 and 2 to attach the other side bracket.
-
 1
1 -
2
-
3
-
4
-
5
-
6
-
7
-
8
-
9
-
10
-
11
-
12
-
13
-
14
-
15
-
16
-
17
-
18
-
19
-
20
-
21
-
22
-
23
-
24
-
25
-
26
-
27
-
28
-
29
-
30
-
31
-
32
-
33
-
34
-
 35
35 -
 36
36 -
 37
37 -
 38
38 -
 39
39 -
 40
40 -
 41
41 -
 42
42 -
 43
43 -
 44
44 -
 45
45 -
46
-
47
-
48
-
49
-
50
-
51
-
52
-
53
-
54
-
55
-
56
-
57
-
58
-
59
-
60
-
61
-
62
-
63
-
64
-
65
-
66
-
67
-
68
-
69
-
70
-
71
-
72
-
73
-
74
-
75
-
76
-
77
-
78
-
79
-
80
-
81
-
82
-
83
-
84
-
85
-
86
-
87
-
88
-
89
-
90
-
91
-
92
-
93
-
94
-
95
-
96
-
97
-
98
-
99
-
100
-
101
-
102
-
103
-
104
-
105
-
106
-
107
-
108
-
109
-
110
-
111
-
112
-
113
-
114
-
115
-
116
-
117
-
118
-
119
-
120
-
121
-
122
-
123
-
124
 |
 |
