LG WM3997HWA Owners Manual - Page 15
Connecting the Drain Line
 |
View all LG WM3997HWA manuals
Add to My Manuals
Save this manual to your list of manuals |
Page 15 highlights
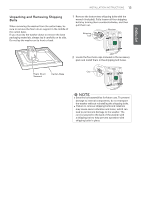
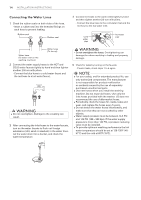
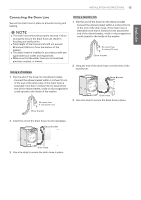
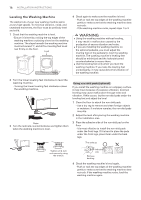
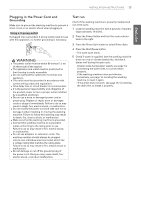
ENGLISH INSTALLATION INSTRUCTIONS 15 Connecting the Drain Line Secure the drain hose in place to prevent moving and leaking. NOTE yyThe drain hose should be properly secured. Failure to properly secure the drain hose can result in flooding and malfunction. yyTotal height of the hose end should not exceed 96 inches (244.8 cm) from the bottom of the washer. yyThe drain must be installed in accordance with any applicable local codes and regulations. yyMake sure that the water lines are not stretched, pinched, crushed, or kinked. Using a standpipe 1 Clip the end of the hose into the elbow bracket. - Connect the elbow bracket within 4 inches (10 cm) of the end of the drain hose. If the drain hose is extended more than 4 inches (10 cm) beyond the end of the elbow bracket, mold or microorganisms could spread to the inside of the washer. No more than 4 inches (10 cm) Using a laundry tub 1 Clip the end of the hose into the elbow bracket. - Connect the elbow bracket within 4 inches (10 cm) of the end of the drain hose. If the drain hose is extended more than 4 inches (10 cm) beyond the end of the elbow bracket, mold or microorganisms could spread to the inside of the washer. No more than 4 inches (10 cm) Elbow bracket 2 Hang the end of the drain hose over the side of the laundry tub. Elbow Bracket Drain Hose 3 Use a tie strap to secure the drain hose in place. Elbow bracket 2 Insert the end of the drain hose into the standpipe. Elbow Bracket Drain Hose 3 Use a tie strap to secure the drain hose in place.
-
 1
1 -
2
-
3
-
4
-
5
-
6
-
7
-
8
-
9
-
 10
10 -
 11
11 -
 12
12 -
 13
13 -
 14
14 -
 15
15 -
 16
16 -
 17
17 -
 18
18 -
 19
19 -
 20
20 -
21
-
22
-
23
-
24
-
25
-
26
-
27
-
28
-
29
-
30
-
31
-
32
-
33
-
34
-
35
-
36
-
37
-
38
-
39
-
40
-
41
-
42
-
43
-
44
-
45
-
46
-
47
-
48
-
49
-
50
-
51
-
52
-
53
-
54
-
55
-
56
-
57
-
58
-
59
-
60
-
61
-
62
-
63
-
64
-
65
-
66
-
67
-
68
-
69
-
70
-
71
-
72
-
73
-
74
-
75
-
76
-
77
-
78
-
79
-
80
 |
 |
