Lenovo 22P7196 User Guide - Page 18
Accessing, Rescue, Recovery, workspace, Reinstalling, Uninstalling
 |
UPC - 000435296191
View all Lenovo 22P7196 manuals
Add to My Manuals
Save this manual to your list of manuals |
Page 18 highlights
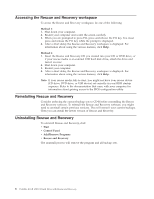
Accessing the Rescue and Recovery workspace To access the Rescue and Recovery workspace, do one of the following: Method 1: 1. Shut down your computer. 2. Restart your computer and watch the screen carefully. 3. When you are prompted to press F11, press and release the F11 key. You must press and release the F11 key while the prompt is displayed. 4. After a short delay, the Rescue and Recovery workspace is displayed. For information about using the various features, click Help. Method 2: 1. Insert the Rescue and Recovery CD you created into your CD or DVD drive, or if your rescue media is an external USB hard disk drive, attach the drive and turn it on now. 2. Shut down your computer. 3. Restart your computer. 4. After a short delay, the Rescue and Recovery workspace is displayed. For information about using the various features, click Help. Note: If your rescue media fails to start, you might not have your rescue device (CD drive, DVD drive, or USB device) set correctly in your BIOS startup sequence. Refer to the documentation that came with your computer for information about gaining access to the BIOS configuration utility. Reinstalling Rescue and Recovery Consider archiving the current backup sets to CD-R before reinstalling the Rescue and Recovery software. To reinstall the Rescue and Recovery software, you might need to uninstall certain previous versions. This will remove your current backups. Then you can install the newer version of Rescue and Recovery. Uninstalling Rescue and Recovery To uninstall Rescue and Recovery, click: v Start v Control Panel v Add/Remove Programs v Rescue and Recovery The uninstall process will remove the program and all backup sets. 8 Portable 40 GB USB 2.0 Hard Drive with Rescue and Recovery
-
 1
1 -
2
-
3
-
4
-
5
-
6
-
7
-
8
-
9
-
10
-
11
-
12
-
 13
13 -
 14
14 -
 15
15 -
 16
16 -
 17
17 -
 18
18 -
 19
19 -
 20
20 -
 21
21 -
 22
22 -
 23
23 -
24
-
25
-
26
-
27
-
28
-
29
-
30
-
31
-
32
-
33
-
34
-
35
-
36
-
37
-
38
-
39
-
40
-
41
-
42
-
43
-
44
-
45
-
46
-
47
-
48
-
49
-
50
-
51
-
52
-
53
-
54
-
55
-
56
-
57
-
58
 |
 |