Lenovo E40-30 Laptop Hardware Maintenance Manual - Lenovo E40-xx Notebook - Page 64
Hard disk drive or solid-state hybrid drive, Applying labels to the base cover assembly
 |
View all Lenovo E40-30 Laptop manuals
Add to My Manuals
Save this manual to your list of manuals |
Page 64 highlights
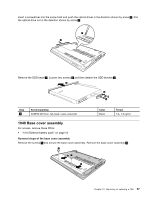
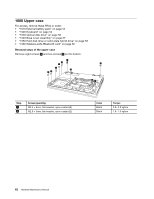
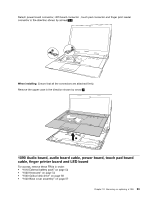
Step 1 Screw (quantity) SCREW M2.5*6mm, flat-head, nylok-coated (2) Color Black Torque 2.0- 2.5 kgfcm Applying labels to the base cover assembly: The new base cover assembly is shipped with a kit containing labels of several kinds. Apply those labels when you replace the base cover assembly. For the labels that are not shipped with the new base cover assembly, peel them from the old base cover assembly, and adhere them to the new one. Note: If the Certificate of Authenticity (COA) label (b) is attached to a replaced part, return the replaced part to the customer, or provide a letter to the customer stating the original label part number, serial number, and product key. The following illustration shows the location of each label. a b c d e f a Rating label b Rating print label c COA label (windows 7) / GML label (for windows 8.1) d Wlan label e BT label f Indonesia rating label 1050 Hard disk drive or solid-state hybrid drive For access, remove these FRUs in order: • "1010 External battery pack" on page 54 • "1040 Base cover assembly" on page 57 Attention: • Do not drop the drive or apply any physical shock to it. The drive is sensitive to physical shock. Improper handling can cause damage and permanent loss of data. • Before removing the drive, have the user make a backup copy of all the information on it if possible. • Never remove the drive while the system is operating or in suspend mode. 58 Hardware Maintenance Manual
-
 1
1 -
2
-
3
-
4
-
5
-
6
-
7
-
8
-
9
-
10
-
11
-
12
-
13
-
14
-
15
-
16
-
17
-
18
-
19
-
20
-
21
-
22
-
23
-
24
-
25
-
26
-
27
-
28
-
29
-
30
-
31
-
32
-
33
-
34
-
35
-
36
-
37
-
38
-
39
-
40
-
41
-
42
-
43
-
44
-
45
-
46
-
47
-
48
-
49
-
50
-
51
-
52
-
53
-
54
-
55
-
56
-
57
-
58
-
 59
59 -
 60
60 -
 61
61 -
 62
62 -
 63
63 -
 64
64 -
 65
65 -
 66
66 -
 67
67 -
 68
68 -
 69
69 -
70
-
71
-
72
-
73
-
74
-
75
-
76
-
77
-
78
-
79
-
80
-
81
-
82
-
83
-
84
-
85
-
86
-
87
-
88
-
89
-
90
 |
 |