Lenovo IdeaCentre B500 Lenovo IdeaCentre B500 Hardware Maintenance Manual - Page 40
Replace the speakers system
 |
View all Lenovo IdeaCentre B500 manuals
Add to My Manuals
Save this manual to your list of manuals |
Page 40 highlights
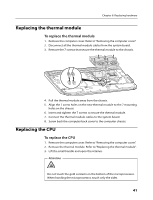
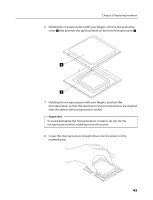
Hardware Maintenance Manual 3. Remove the two screws that secure the optical drive to the metal bracket. 4. Screw back the metal bracket to the new optical drive. 5. Slide the new optical drive into the drive bay and screw the optical drive back to the chassis. 6. Connect the ODD data and power cables to the optical drive. 7. Screw back the computer back cover to the computer chassis. Replace the speakers system To replace the speakers system 1. Remove the computer cover. Refer to "Removing the computer cover". 2. Remove the four screws that secure the left and right speakers to the chassis. 3. Disconnect the speakers' cable from the system board 2 , and pull out the left and right speakers from the chassis 1 . 1 1 2 38
-
 1
1 -
2
-
3
-
4
-
5
-
6
-
7
-
8
-
9
-
10
-
11
-
12
-
13
-
14
-
15
-
16
-
17
-
18
-
19
-
20
-
21
-
22
-
23
-
24
-
25
-
26
-
27
-
28
-
29
-
30
-
31
-
32
-
33
-
34
-
 35
35 -
 36
36 -
 37
37 -
 38
38 -
 39
39 -
 40
40 -
 41
41 -
 42
42 -
 43
43 -
 44
44 -
 45
45 -
46
-
47
-
48
-
49
-
50
-
51
-
52
-
53
-
54
-
55
-
56
-
57
-
58
-
59
-
60
 |
 |

Hardware Maintenance Manual
38
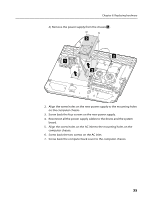
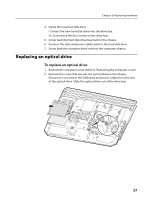
3.
Remove the two screws that secure the optical drive to the metal
bracket.
4.
Screw back the metal bracket to the new optical drive.
5.
Slide the new optical drive into the drive bay and screw the optical
drive back to the chassis.
6.
Connect the ODD data and power cables to the optical drive.
7.
Screw back the computer back cover to the computer chassis.
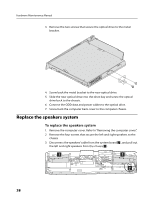
Replace the speakers system
To replace the speakers system
1.
Remove the computer cover. Refer to “Removing the computer cover”.
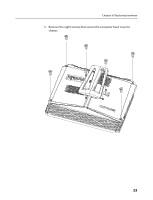
2.
Remove the four screws that secure the left and right speakers to the
chassis.
3.
Disconnect the speakers’ cable from the system board
2
, and pull out
the left and right speakers from the chassis
1
.
1
1
2