Lenovo IdeaCentre K230 Hardware Maintenance Manual for K220 - Page 57
Replacing the mouse
 |
View all Lenovo IdeaCentre K230 manuals
Add to My Manuals
Save this manual to your list of manuals |
Page 57 highlights
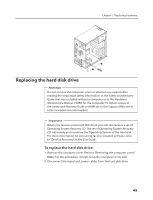
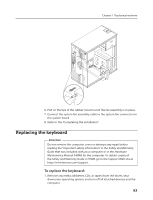
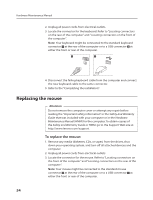
Hardware Maintenance Manual 2. Unplug all power cords from electrical outlets. 3. Locate the connector for the keyboard. Refer to "Locating connectors on the rear of the computer" and "Locating connectors on the front of the computer". Note: Your keyboard might be connected to the standard keyboard connector at the rear of the computer or to a USB connector at either the front or rear of the computer. 4. Disconnect the failing keyboard cable from the computer and connect the new keyboard cable to the same connector. 5. Refer to the "Completing the installation". Replacing the mouse Attention Do not remove the computer cover or attempt any repair before reading the "Important safety information" in the Safety and Warranty Guide that was included with your computer or in the Hardware Maintenance Manual (HMM) for the computer. To obtain copies of the Safety and Warranty Guide or HMM, go to the Support Web site at http://www.lenovo.com/support. To replace the mouse: 1. Remove any media (diskettes, CDs, or tapes) from the drives, shut down your operating system, and turn off all attached devices and the computer. 2. Unplug all power cords from electrical outlets. 3. Locate the connector for the mouse. Refer to "Locating connectors on the front of the computer" and "Locating connectors on the rear of the computer". Note: Your mouse might be connected to the standard mouse connector at the rear of the computer or to a USB connector at either the front or rear of the computer. 54
-
 1
1 -
2
-
3
-
4
-
5
-
6
-
7
-
8
-
9
-
10
-
11
-
12
-
13
-
14
-
15
-
16
-
17
-
18
-
19
-
20
-
21
-
22
-
23
-
24
-
25
-
26
-
27
-
28
-
29
-
30
-
31
-
32
-
33
-
34
-
35
-
36
-
37
-
38
-
39
-
40
-
41
-
42
-
43
-
44
-
45
-
46
-
47
-
48
-
49
-
50
-
51
-
 52
52 -
 53
53 -
 54
54 -
 55
55 -
 56
56 -
 57
57 -
 58
58 -
 59
59 -
 60
60 -
 61
61 -
 62
62 -
63
-
64
 |
 |
