Lenovo Li2341t Wide Flat Panel Monitor User Guide - Lenovo Li2341t Wide Flat P - Page 33
Capabilities, Connecting and Switching On, NextWindow's Application Programming Interface.
 |
View all Lenovo Li2341t Wide Flat Panel Monitor manuals
Add to My Manuals
Save this manual to your list of manuals |
Page 33 highlights
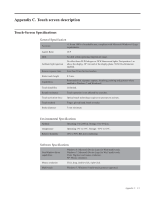
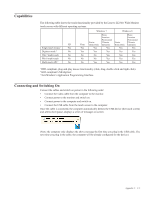
Capabilities The following table shows the touch functionality provided by the Lenovo LI2341t Wide Monitor touch screen with different operating systems. XP Single touch mouse 1 Yes Digitiser mode 2 No Win 7 multi-touch No Win 8 multi-touch No Multi-touch API 3 No Vista Yes Yes No No No Windows 7 Starter Home Basic Yes Home Premium Professional Ultimate Enterprise Yes Yes Yes No Yes No Yes Yes Yes Windows 8 Starter Home Basic Yes Home Premium Professional Ultimate Enterprise Yes Yes Yes Yes Yes Yes Yes Yes Yes 1 HID-compliant, plug-and-play mouse functionality (click, drag, double-click and right-click). 2 HID-compliant USB digitiser. 3 NextWindow's Application Programming Interface. Connecting and Switching On Connect the cables and switch on power in the following order: •• Connect the video cable from the computer to the monitor. •• Connect power to the monitor and switch on. •• Connect power to the computer and switch on. •• Connect the USB cable from the touch screen to the computer. Once the cable is connected, the computer automatically detects the USB device (the touch screen) and, aftera short pause, displays a series of messages on screen. (Note: the computer only displays the above message the first time you plug in the USB cable. The next time you plug in the cable, the computer will be already configured for the device.) Appendix C. C-2
-
 1
1 -
2
-
3
-
4
-
5
-
6
-
7
-
8
-
9
-
10
-
11
-
12
-
13
-
14
-
15
-
16
-
17
-
18
-
19
-
20
-
21
-
22
-
23
-
24
-
25
-
26
-
27
-
 28
28 -
 29
29 -
 30
30 -
 31
31 -
 32
32 -
 33
33 -
 34
34
 |
 |
