Lenovo N20 Chromebook Hardware Maintenance Manual - Lenovo N20 Chromebook - Page 46
Disassemble the LCD module, Remove the LCD bezel, for instructions.
 |
View all Lenovo N20 Chromebook manuals
Add to My Manuals
Save this manual to your list of manuals |
Page 46 highlights
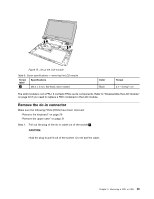
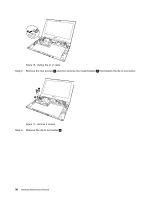
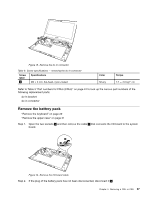
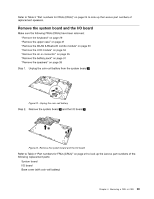
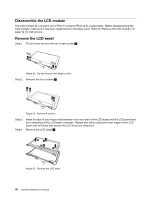
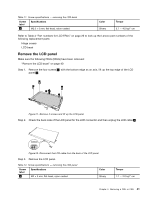
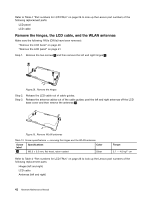
Disassemble the LCD module The LCD module as a whole is not a FRU. It contains FRUs as its components. Before disassembling the LCD module, make sure it has been detached from the base cover. Refer to "Remove the LCD module" on page 34 for instructions. Remove the LCD bezel Step 1. Pry and then remove the two hinge covers 1 . a a Figure 24. Pry and remove two hinge covers Step 2. Remove the four screws 2 . bb bb Figure 25. Remove 4 screws Step 3. Step 4. Insert the tips of your finger nails between one inner side of the LCD bezel and the LCD panel and then carefully pull the LCD bezel outwards. Repeat this action along the inner edges of the LCD bezel until all hooks that secure the LCD bezel are detached. Remove the LCD bezel 3 . c c c c Figure 26. Remove the LCD bezel 40 Hardware Maintenance Manual
-
 1
1 -
2
-
3
-
4
-
5
-
6
-
7
-
8
-
9
-
10
-
11
-
12
-
13
-
14
-
15
-
16
-
17
-
18
-
19
-
20
-
21
-
22
-
23
-
24
-
25
-
26
-
27
-
28
-
29
-
30
-
31
-
32
-
33
-
34
-
35
-
36
-
37
-
38
-
39
-
40
-
 41
41 -
 42
42 -
 43
43 -
 44
44 -
 45
45 -
 46
46 -
 47
47 -
 48
48 -
 49
49 -
 50
50 -
 51
51 -
52
-
53
-
54
-
55
-
56
-
57
-
58
-
59
-
60
-
61
-
62
 |
 |
