Lenovo NetVista X40 Hardware Maintenance Manual for NetVista 2179 and 6643 sys - Page 33
Speaker, assembly, removal, Battery, installation
 |
View all Lenovo NetVista X40 manuals
Add to My Manuals
Save this manual to your list of manuals |
Page 33 highlights
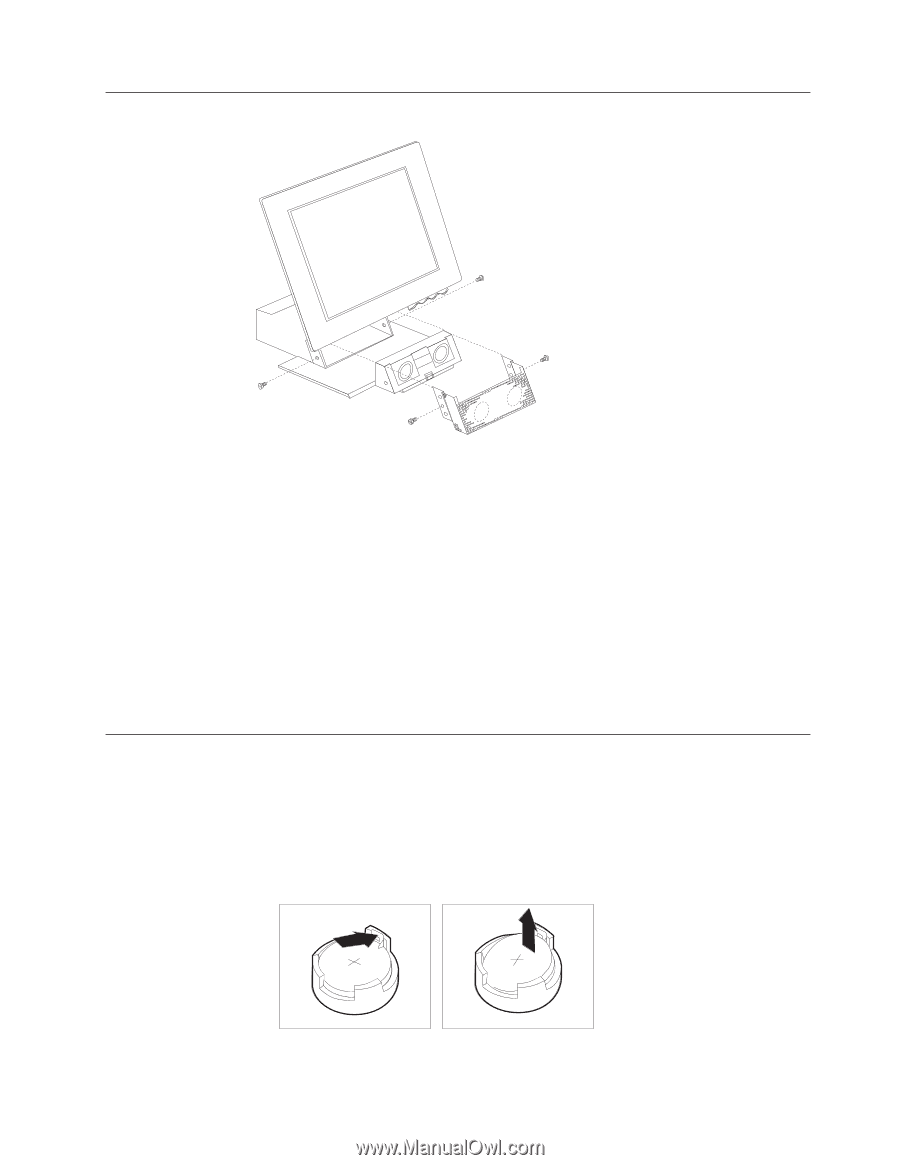
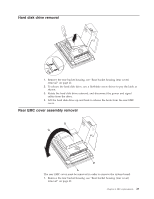
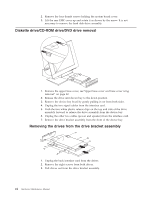
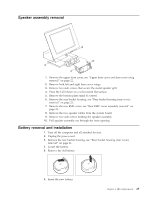
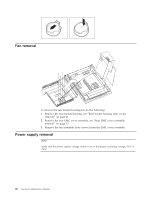
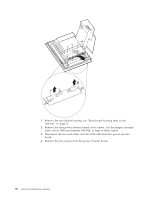
Speaker assembly removal 1. Remove the upper base cover, see "Upper base cover and base cover wing removal" on page 22. 2. Remove both left and right base cover wings. 3. Remove two side screws that secure the metal speaker grill. 4. Place the LCD down on a soft covered flat surface. 5. Remove the bottom plate stand (6 screws). 6. Remove the rear bucket housing, see "Rear bucket housing (rear cover) removal" on page 21. 7. Remove the rear EMC cover, see "Rear EMC cover assembly removal" on page 23. 8. Remove the two speaker cables from the system board. 9. Remove two side screws holding the speaker assembly. 10. Pull speaker assembly out through the front opening. Battery removal and installation 1. Turn off the computer and all attached devices. 2. Unplug the power cord. 3. Remove the rear bucket housing, see "Rear bucket housing (rear cover) removal" on page 21. 4. Locate the battery. 5. Remove the old battery. 6. Insert the new battery. Chapter 4. FRU replacements 25
-
 1
1 -
2
-
3
-
4
-
5
-
6
-
7
-
8
-
9
-
10
-
11
-
12
-
13
-
14
-
15
-
16
-
17
-
18
-
19
-
20
-
21
-
22
-
23
-
24
-
25
-
26
-
27
-
 28
28 -
 29
29 -
 30
30 -
 31
31 -
 32
32 -
 33
33 -
 34
34 -
 35
35 -
 36
36 -
 37
37 -
 38
38 -
39
-
40
-
41
-
42
-
43
-
44
-
45
-
46
-
47
-
48
-
49
-
50
-
51
-
52
-
53
-
54
-
55
-
56
-
57
-
58
-
59
-
60
-
61
-
62
-
63
-
64
-
65
-
66
-
67
-
68
-
69
-
70
-
71
-
72
-
73
-
74
-
75
-
76
-
77
-
78
-
79
-
80
-
81
-
82
-
83
-
84
-
85
-
86
-
87
-
88
-
89
-
90
-
91
-
92
-
93
-
94
-
95
-
96
-
97
-
98
-
99
-
100
-
101
-
102
-
103
-
104
-
105
-
106
-
107
-
108
-
109
-
110
-
111
-
112
-
113
-
114
-
115
-
116
-
117
-
118
-
119
-
120
-
121
-
122
-
123
-
124
-
125
-
126
-
127
-
128
 |
 |