Lenovo S50-30 (English) User Guide - Lenovo S50-30 - Page 43
Line up the locating pins on the hard disk drive assembly with the mounting, holes on the chassis
 |
View all Lenovo S50-30 manuals
Add to My Manuals
Save this manual to your list of manuals |
Page 43 highlights
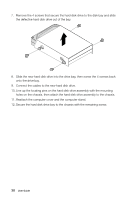
7. Remove the 4 screws that secure the hard disk drive to the disk bay and slide the defective hard disk drive out of the bay. 8. Slide the new hard disk drive into the drive bay, then screw the 4 screws back onto the drive bay. 9. Connect the cables to the new hard disk drive. 10. Line up the locating pins on the hard disk drive assembly with the mounting holes on the chassis, then attach the hard disk drive assembly to the chassis. 11. Reattach the computer cover and the computer stand. 12. Secure the hard disk drive bay to the chassis with the remaining screw. 38 User Guide
-
 1
1 -
2
-
3
-
4
-
5
-
6
-
7
-
8
-
9
-
10
-
11
-
12
-
13
-
14
-
15
-
16
-
17
-
18
-
19
-
20
-
21
-
22
-
23
-
24
-
25
-
26
-
27
-
28
-
29
-
30
-
31
-
32
-
33
-
34
-
35
-
36
-
37
-
 38
38 -
 39
39 -
 40
40 -
 41
41 -
 42
42 -
 43
43 -
 44
44 -
 45
45 -
 46
46 -
 47
47 -
 48
48 -
49
-
50
-
51
 |
 |

38
User Guide
7.
Remove the 4 screws that secure the hard disk drive to the disk bay and slide
the defective hard disk drive out of the bay.
8.
Slide the new hard disk drive into the drive bay, then screw the 4 screws back
onto the drive bay.
9.
Connect the cables to the new hard disk drive.
10. Line up the locating pins on the hard disk drive assembly with the mounting
holes on the chassis, then attach the hard disk drive assembly to the chassis.
11. Reattach the computer cover and the computer stand.
12. Secure the hard disk drive bay to the chassis with the remaining screw.